Are you ready to take your online learning platform to the next level? If you’re using the Eduma theme,you’re already on the right track! This powerful WordPress theme is designed specifically for educational websites,but customizing it to fit your unique vision can feel a bit overwhelming—especially if you’re not a tech whiz. don’t worry! In this comprehensive guide, we’ll walk you through the ins and outs of editing the Eduma theme, making it as easy as pie. Whether you want to tweak the layout, adjust the colors, or even add new features, we’ve got you covered. By the end of this article, you’ll have the confidence and skills to transform your site into an engaging and visually stunning learning hub. Ready to unleash your creativity? Let’s dive in!
Understanding the Eduma Theme Basics for Seamless Customization
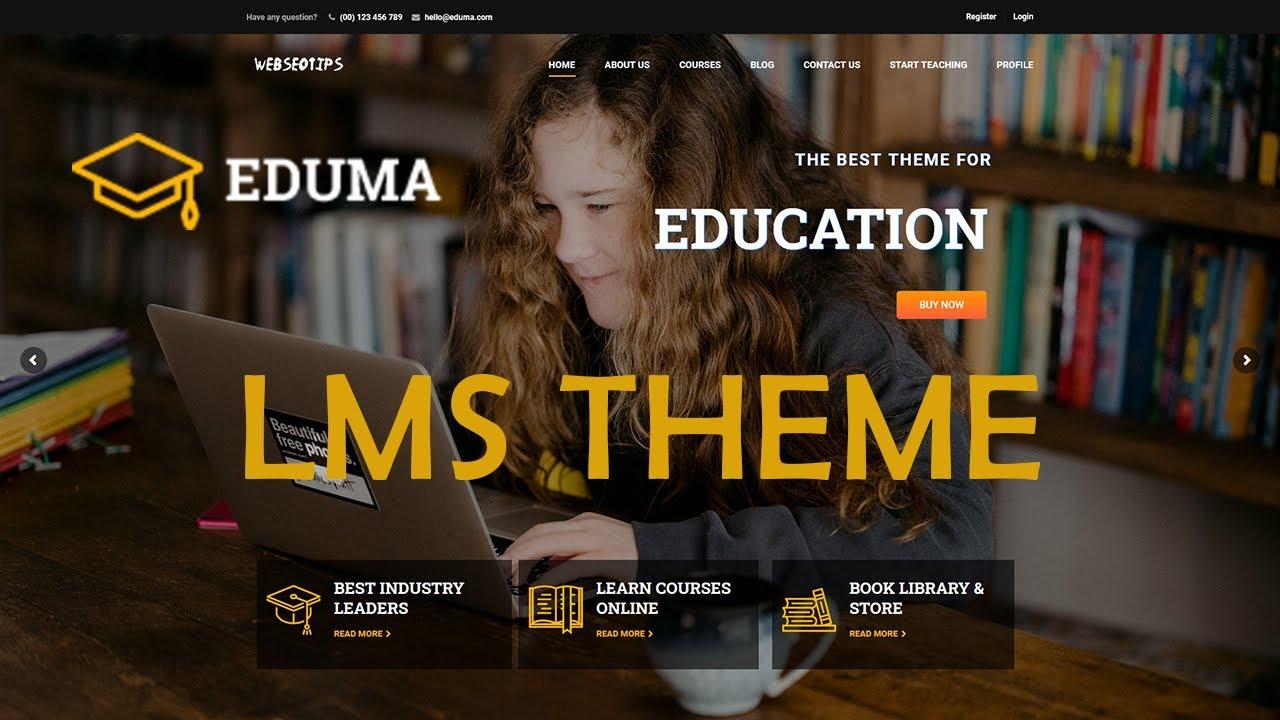
To truly make the Eduma theme your own,it’s essential to grasp its core components and functionalities. The Eduma theme is not just a template; it’s a robust platform designed for educational institutions, online courses, and learning management systems (LMS). Its highly customizable nature allows you to adapt the design and features to match your unique branding and educational objectives.
First, familiarize yourself with the Theme Options Panel. This is your command center for making visual adjustments without needing extensive coding knowledge. Here,you can modify:
- Color Schemes: Adjust the primary colors to align with your brand’s identity.
- Typography: Change fonts to enhance readability and aesthetic appeal.
- Logo and Favicon: Upload your logo for consistent branding across your site.
Next,dive into the Page Builder,which allows for drag-and-drop functionalities. This tool is a game changer in web design. You can create stunning layouts for your pages and posts effortlessly. Consider utilizing the following elements:
- Sections: Organize your content into easily digestible blocks.
- Headers: Use eye-catching titles to attract attention.
- Buttons: Include call-to-action buttons to guide users seamlessly.
Don’t overlook the importance of Plugins that enhance the Eduma theme’s capabilities. Some recommended plugins include:
- LearnPress: For comprehensive course management.
- Elementor: For advanced page building features.
- Yoast SEO: To optimize your site for search engines.
Lastly, keep an eye on the Responsive Design aspect. The Eduma theme is built to be mobile-friendly, ensuring an excellent user experience across devices. Regularly test your site on various screen sizes and make adjustments as necessary for optimal functionality.
Exploring the Essential Features of Eduma Theme
when it comes to building a robust educational website, the Eduma theme stands out as an exceptional choice. This powerful WordPress theme is tailored specifically for educational institutions, online courses, and e-learning platforms. Understanding its essential features will empower you to make the most of your site,ensuring a seamless experience for both you and your learners.
One of the standout features is the drag-and-drop page builder, which allows you to customize your pages effortlessly. With just a few clicks, you can create stunning layouts that reflect your brand’s identity. Additionally, the theme comes with a variety of pre-designed templates that can be easily imported and modified. This flexibility saves time and ensures that your website not only looks professional but also functions optimally.
Another crucial aspect is the integration with popular learning management systems (LMS). Eduma is compatible with plugins such as LearnPress, enabling you to create and manage courses with ease.You can organize course content, quizzes, and assignments, making it an all-in-one solution for educators. Plus,the theme supports various payment gateways,so you can monetize your courses effortlessly.
Furthermore, Eduma prioritizes responsive design, ensuring that your website looks great on all devices.Given the increasing number of users accessing content via smartphones and tablets,having a mobile-friendly site is essential. With this theme, you don’t have to worry about compromising on aesthetics or functionality, no matter the screen size.
To enhance user engagement, Eduma includes features like student profiles, progress tracking, and a community forum. These elements foster an interactive learning environment, allowing students to connect with peers and instructors.By incorporating these features, you create a more enriching educational experience that keeps learners coming back for more.
| Feature | Description |
|---|---|
| Drag-and-Drop Builder | Customize layouts easily with no coding required. |
| LMS Integration | Seamless compatibility with LearnPress for course management. |
| Responsive Design | Optimal viewing experience on all devices. |
| Student Profiles | Personalized accounts for tracking progress and achievements. |
Step-by-Step Guide to Installing the Eduma Theme Like a Pro
Installing the Eduma theme can be a seamless experience if you follow these straightforward steps. First,ensure you have a WordPress site set up and ready to go. After your WordPress installation, it’s time to dive into the theme installation process.
Start by navigating to your WordPress Dashboard:
- Select Appearance from the sidebar.
- Click on Themes.
- Hit the Add new button at the top.
Next, you’ll want to upload the Eduma theme:
- Click on upload Theme.
- Select the downloaded Eduma theme ZIP file from your computer.
- Click Install Now to initiate the installation.
once the theme is installed, activate it:
- Click on Activate to set the Eduma theme as your current theme.
- Your site is now operating with the new theme!
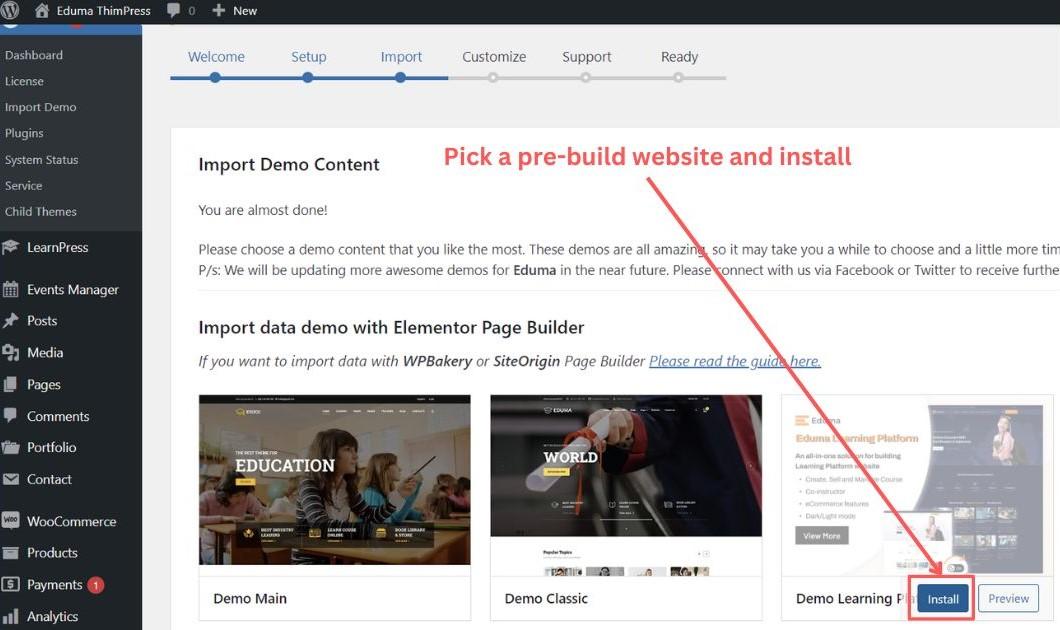
To ensure a smooth setup, you may need to import demo content:
- From your dashboard, go to Eduma > Import Demo Data.
- Select the demo you wish to import and click Import.
Lastly, customize the theme to fit your vision:
- navigate to Appearance > Customize.
- Modify your site title, tagline, colors, and more.
- Preview changes live before publishing them!
| step | Action |
|---|---|
| 1 | Go to Appearance > Themes |
| 2 | Upload Eduma theme ZIP |
| 3 | Activate the theme |
| 4 | Import demo content |
| 5 | Customize your site |
By following these steps, you’ll have your Eduma theme installed and customized like a pro in no time! Enjoy the rich features and functionalities that Eduma offers for your educational website.
Customizing Your Sites Appearance with Edumas Built-In Options
Customizing the appearance of your Eduma theme is a straightforward process,thanks to its built-in options. You don’t need to touch a single line of code to create a visually stunning website that reflects your brand. Whether you are aiming for a sleek, modern look or a more traditional feel, Eduma has the tools to help you achieve your vision.
Start by exploring the Theme Customizer, which can be accessed through your WordPress dashboard.This intuitive interface allows you to adjust various aspects of your site in real-time. Here are some key features you can modify:
- Color Schemes: Choose from a variety of pre-defined color palettes or create your own custom colors to match your branding.
- Font Options: Select from an array of Google Fonts to find the perfect typeface for your site’s tone and readability.
- Header Layouts: Customize your header with options like logo positioning, menu styles, and background images.
- Footer Settings: Adjust the footer to include additional information,social media links,or custom widgets.
Another powerful feature is the Page Builder integration. With the drag-and-drop functionality, you can create unique layouts that stand out. Simply select the elements you want to include—such as sliders, galleries, or testimonials—and arrange them as you see fit.
Don’t forget about the Widgets section! Eduma allows you to add various widgets to your sidebars and footer areas, enhancing functionality and user experience.Popular options include:
- Recent Posts: Keep your audience engaged with the latest updates from your site.
- Popular Courses: Highlight your best-selling courses to attract more enrollments.
- Contact form: Make it easy for visitors to reach out for inquiries.
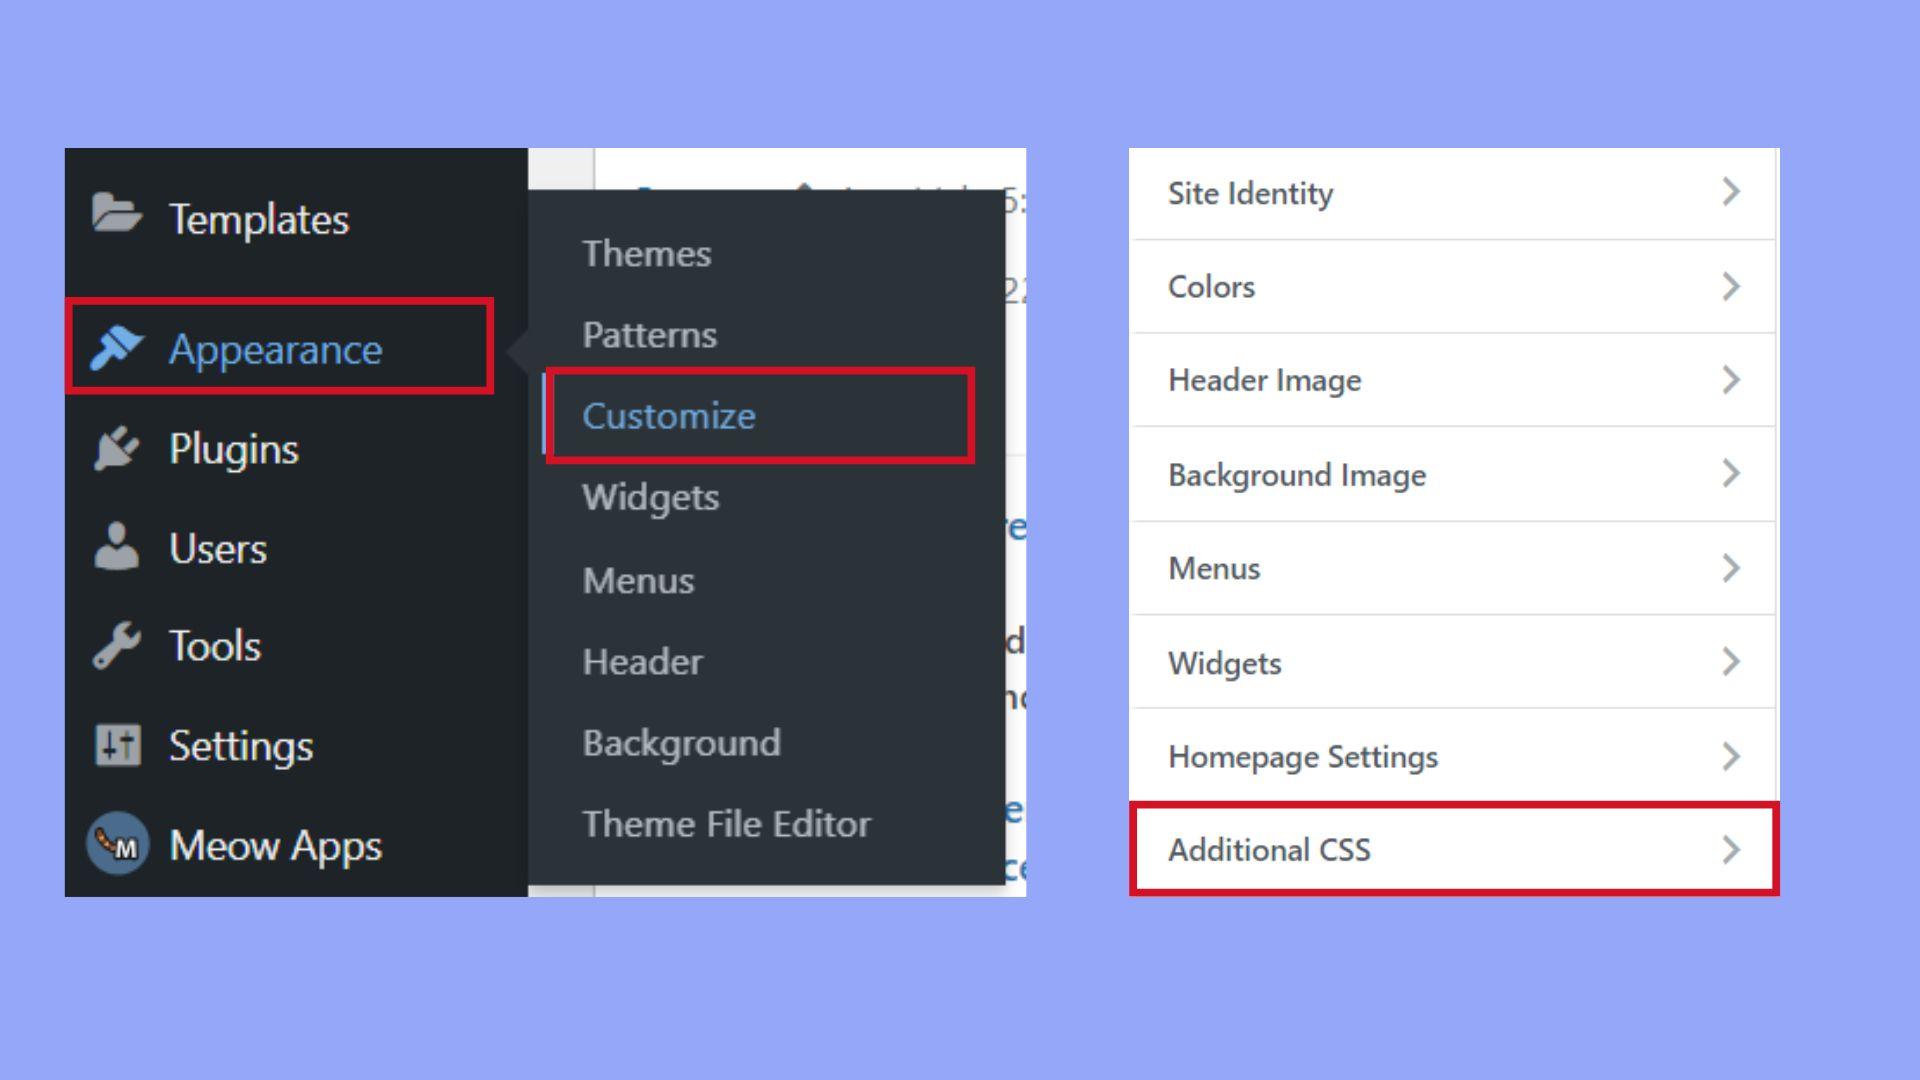
If you want to take your design a step further, consider using custom CSS. By navigating to the additional CSS section in the Customizer, you can implement unique styles that aren’t available through the standard options. This is perfect for those who have a specific vision in mind and want to fine-tune thier site’s aesthetics.
| Feature | Description |
|---|---|
| Live Preview | See changes in real-time as you customize the site. |
| One-Click Demo Import | Quickly replicate your favorite demo layout with a single click. |
| Responsive Design | Your site will look great on any device, from desktops to smartphones. |
with these built-in customization options, eduma empowers you to create a site that not only meets your educational goals but also engages your audience in a visually appealing way. Dive into the customization options and make your mark today!
Leveraging Page Builders for Enhanced Flexibility in Eduma
Page builders are a game-changer when it comes to customizing the Eduma theme, offering an intuitive interface that considerably enhances your design flexibility. With these powerful tools at your disposal, you can easily craft stunning layouts without any coding knowledge. whether you’re creating a new course page or revamping your homepage,page builders allow you to drag and drop elements with ease,giving you full control over the aesthetics and functionality of your site.
By leveraging page builders, you can:
- Customize layouts: Adjust the position of elements, create multi-column designs, and apply unique styles to different sections.
- Incorporate dynamic content: Add interactive features like sliders, testimonials, and course grids that engage your visitors.
- Enhance mobile responsiveness: Ensure that your website looks great on all devices by optimizing layouts for smartphones and tablets.
Furthermore, many page builders come equipped with a library of pre-designed templates that can jumpstart your design process.You can choose from various styles that suit the educational niche, such as:
| Template Style | Description |
|---|---|
| Course Showcase | A visually appealing layout to highlight your courses effectively. |
| Instructor Profile | A professional design to present instructor details and bios. |
| Testimonials | A dedicated section showcasing student feedback and success stories. |
Integrating these templates with your Eduma theme not only saves time but also ensures a cohesive look throughout your website. Plus, the real-time editing capabilities allow you to experiment with different designs, see instant previews, and fine-tune your website until it meets your vision. This level of customization is invaluable for educators aiming to create a unique online learning environment that stands out in a crowded marketplace.
As you dive into editing your Eduma theme with a page builder, don’t hesitate to explore various plugins that enhance functionality, such as forms, pop-ups, and analytics tools. These additions can greatly improve user engagement and provide valuable insights into your audience’s behavior. The combination of a page builder with these plugins creates an all-in-one solution for building a powerful and flexible educational platform.
Optimizing Your Eduma Theme for Speed and Performance
When it comes to enhancing the performance of your Eduma theme,every second counts. A fast-loading website not only improves user experience but also positively impacts your search engine rankings. Here’s how you can optimize your Eduma theme to ensure it runs smoothly and efficiently.
Leverage Caching Plugins: One of the most effective ways to boost your website’s speed is by using caching plugins. These tools create static versions of your pages, significantly reducing the load time for returning visitors. Consider popular options like:
- WP Super Cache
- W3 Total Cache
- WP Rocket
Optimize Images: Large images can drastically slow down your website. To avoid this, ensure that you:
- Compress images before uploading.
- Utilize responsive images to cater to various screen sizes.
- Consider using WebP format for smaller file sizes without sacrificing quality.
Minimize HTTP Requests: Each element on your page requires a separate HTTP request, which can slow down loading times. To minimize these requests, try the following:
- Combine CSS and JavaScript files.
- use icon fonts rather of images for icons.
- Remove unnecessary plugins that add extra scripts.
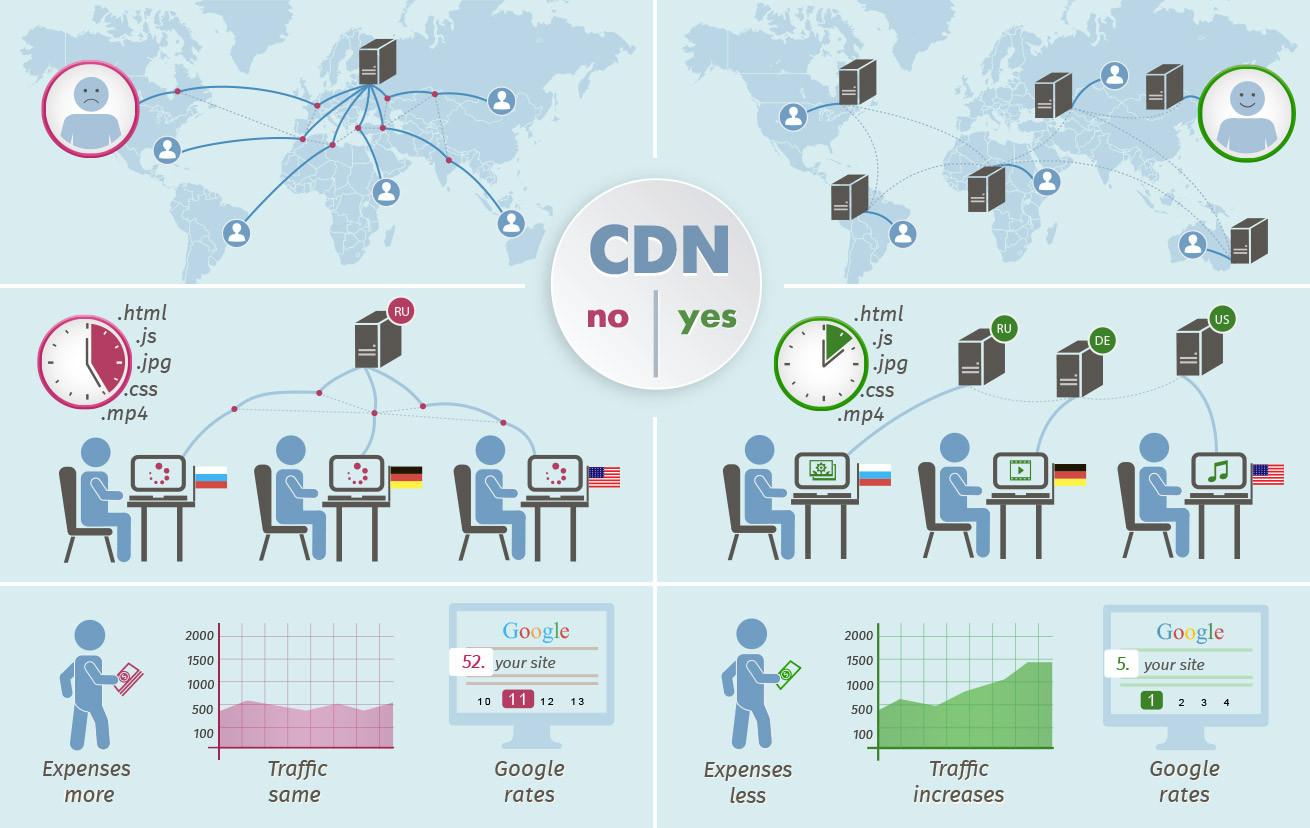
Utilize a Content Delivery Network (CDN): A CDN can drastically improve loading times by serving your content from servers closest to your visitors. This reduces latency and provides a faster browsing experience. Some popular CDN providers include:
- Cloudflare
- MaxCDN
- Akamai
| Optimization Technique | Benefits |
|---|---|
| Caching Plugins | Faster load times for repeated visits |
| image Optimization | Reduced file sizes enhance loading speed |
| Minimizing HTTP Requests | Less time connecting and loading resources |
| CDN Usage | Faster content delivery to global users |
implementing these strategies will not only enhance the speed and performance of your Eduma theme but will also create a better experience for your users. remember, a speedy site is a happy site!
Best Practices for Eduma Theme SEO to Boost Your Visibility
to enhance your website’s visibility using the Eduma theme, it’s crucial to implement effective SEO strategies. One of the foremost practices is to ensure your content is high-quality and relevant. This includes using targeted keywords naturally throughout your content, especially in headings and subheadings.
Another key aspect is optimizing your site’s loading speed. Fast-loading websites not only improve user experience but also positively impact search engine rankings. Utilize tools like GTmetrix or Google PageSpeed Insights to identify areas for improvement. Here are some tips to enhance your site speed:
- Compress images using plugins like Smush or Imagify.
- Minimize CSS and javascript files with plugins such as Autoptimize.
- Use a reliable caching plugin like WP Super Cache to store static versions of your pages.
Don’t overlook the importance of meta tags. Craft compelling meta titles and descriptions that encapsulate your content’s essence while integrating your primary keywords. This can significantly improve your click-through rates from search engine results. Here’s a simple table to guide you through significant meta tag elements:
| Meta Tag | Purpose |
|---|---|
| Title Tag | Defines the title of your page, shown in search results. |
| Meta Description | A brief summary of your page content,influencing click rates. |
| Header Tags | Organizes content structure, improves readability and SEO. |
Lastly, focus on creating a well-structured sitemap and implementing schema markup. A sitemap helps search engines crawl your site more effectively, while schema markup can provide additional context to your content, enhancing visibility in search results. Tools like Yoast SEO can assist you in these tasks, simplifying the process of optimizing your Eduma theme for search engines.

Troubleshooting Common Issues in Eduma theme Editing
Editing the Eduma theme can be a rewarding experience, but it’s not without its challenges. Here are some common issues you may encounter and effective solutions to tackle them.
1. layout Issues: Sometimes,the layout of your pages may not appear as intended. This could be due to:
- Incorrect Page Builder Settings: Ensure you’re using the correct templates and settings in the page builder.
- Conflicting Plugins: Deactivate plugins one by one to identify any conflicts that might disrupt your layout.
- Browser Cache: Clear your browser cache or try an incognito window to see the most recent changes.
2. Images Not Displaying: If images aren’t showing up as expected, consider the following:
- File Permissions: Check that your image files have the correct permissions set (usually 644).
- Image URLs: Confirm that the image URLs are correct and that the images are uploaded to the right directories.
- Theme Settings: Navigate to the theme settings and ensure images are enabled for display in the desired sections.
3. Slow Loading Times: A sluggish site can deter visitors. To improve loading times:
- Optimize Images: Use tools like TinyPNG to compress your images without losing quality.
- Minify CSS and JavaScript: Use plugins such as Autoptimize to reduce file sizes.
- Content Delivery Network (CDN): Consider using a CDN to distribute your site’s content more efficiently.
| Issue | Possible Fix |
|---|---|
| Layout Issues | Check page builder settings, deactivate conflicting plugins. |
| Images Not Displaying | Verify file permissions, confirm image URLs. |
| Slow Loading Times | Optimize images, use a CDN. |
By following these troubleshooting tips, you can overcome the most common issues encountered while editing the Eduma theme. Don’t hesitate to reach out to the support community or documentation for additional guidance!
Unlocking Advanced Customization with CSS and Child Themes
When it comes to customizing your Eduma theme, leveraging CSS and child themes is the key to unlocking advanced design possibilities. Using a child theme allows you to make changes to your website without affecting the original theme’s files. This means that when you update the Eduma theme, your customizations remain intact. Here’s how to make the most of it:
- Create a Child Theme: Start by creating a new folder in the themes directory. Inside, you’ll need a
style.cssfile to define your child theme, and afunctions.phpfile to enqueue the parent theme styles. - Customize with CSS: Once your child theme is set up, you can add custom CSS rules in the
style.cssfile. This is where your creativity shines—whether it’s changing colors, fonts, or layout styles, the sky’s the limit! - Utilize WordPress Customizer: For a more user-friendly approach, use the WordPress Customizer. Navigate to
Appearance > Customizeand add custom CSS directly in the “Additional CSS” section, which applies changes immediately.
To streamline your customization process, consider the following CSS snippets that can enhance the appearance of your Eduma theme:
| Element | CSS Code | Effect |
|---|---|---|
| Header Background | header { background-color: #4CAF50; } | Changes header background color to green. |
| Button Hover | button:hover { background-color: #333; color: white; } | Makes buttons darker on hover. |
| font Style | body { font-family: 'Arial',sans-serif; } | Changes the body font to Arial. |
Keep in mind that specificity is crucial in CSS. If you’re overriding styles from the parent theme, make sure your selectors are specific enough. For example, instead of just using h1, try using .class-name h1 to ensure your styles take precedence.
Lastly, always test your changes across different devices and browsers. Tools like Chrome DevTools allow you to inspect elements and test CSS in real time, making it easier to see what works and what doesn’t. With a little patience and creativity, you can transform the Eduma theme to perfectly reflect your brand’s identity!

Final Touches: Enhancing Your Website’s User Experience with Eduma
To elevate your website’s user experience, leveraging the Eduma theme’s features can make a significant difference. The theme offers a variety of customizable options that can enhance navigability and engagement. Here are some strategies to consider:
- Optimize Your Layout: eduma provides a range of layout options. Play around with different configurations to find what works best for your audience. A well-structured layout ensures that users can find information quickly and intuitively.
- Utilize Custom Widgets: Make use of Eduma’s custom widgets to add functionality without cluttering your design. Whether it’s a course widget or a testimonial slider, these elements can enrich user interaction.
- Integrate Visuals: Incorporate high-quality images and videos to capture attention. Use the theme’s built-in media options to create galleries or video backgrounds, making your content more engaging.
- Ensure Mobile Responsiveness: With an increasing number of users accessing websites via mobile devices, ensure that your Eduma theme is fully responsive. Test your site on various devices to verify that it looks and functions well.
Beyond aesthetics, consider the functional aspects of your website. A streamlined user experience can significantly lower bounce rates and increase time spent on your site. here are some essential elements to include:
| Element | Description |
|---|---|
| Search Bar | Allows users to quickly find specific information or resources. |
| Call-to-Action Buttons | Encourage users to take desired actions, such as signing up for courses or newsletters. |
| User Reviews | Build trust by displaying testimonials and ratings from past users. |
| FAQs Section | Address common questions to assist users and reduce confusion. |
don’t underestimate the power of consistent branding. Ensure that your Eduma theme reflects your brand’s colors, logos, and overall style. This creates a cohesive experience and builds recognition among users. Leverage the theme’s customization options to maintain branding consistency across all pages.
By thoughtfully implementing these enhancements with the Eduma theme,you’ll not only create a visually appealing site but also foster a user-friendly environment that encourages visitors to explore,engage,and convert.
Frequently Asked Questions (FAQ)
Sure! Here’s a Q&A format for an article titled “How To Edit Eduma Theme: A Comprehensive Guide” with a conversational and persuasive tone.
Q1: What is the Eduma theme, and why woudl I want to edit it?
A1: The Eduma theme is a powerful WordPress template designed specifically for educational websites. If you’re running an online school, a course platform, or any educational institution, customizing this theme can help you stand out and better serve your audience.By editing it, you can tailor the look and functionality to match your brand, enhance user experience, and showcase your courses in a way that attracts more students. Who wouldn’t want a website that not only looks stunning but also converts visitors into learners?
Q2: How easy is it to edit the Eduma theme?
A2: Editing the Eduma theme is surprisingly easy! You don’t need to be a tech wizard or a coding expert. With its user-friendly interface and built-in page builder, even beginners can make significant changes. plus, the theme offers good documentation and support, so you’re never really alone in the process. Imagine transforming your website with just a few clicks—sounds enticing, right?
Q3: What are the first steps I should take to start editing my Eduma theme?
A3: Great question! First, make sure you have the Eduma theme installed and activated. Then, familiarize yourself with the WordPress dashboard and locate the theme settings. from there, you can start customizing your site’s appearance—think colors, fonts, and layouts. Dive into the “Customize” section where you can see real-time changes as you make edits. It’s like having a live preview of your new website—how cool is that?
Q4: Can I edit the content of my Eduma theme easily?
A4: Absolutely! Editing content in the Eduma theme is a breeze. You can easily change texts,images,and course details using the page builder. Just click on the section you want to edit, and you’ll have access to all the necessary tools. Need to add a new course? No problem! Want to update some images? A piece of cake! With such flexibility, you can keep your content fresh and engaging—all without stress!
Q5: Are there any tips for making the most of my Eduma theme customization?
A5: Definitely! Here are a few tips to elevate your Eduma theme experience:
- Keep your brand colors consistent: use your brand’s color palette throughout the site for a cohesive look.
- Optimize for mobile: Make sure your edits look great on all devices. Most users access educational websites via mobile, so mobile optimization is key!
- Utilize educational plugins: Enhance functionalities with plugins that support learning management, quizzes, and more.
- Test for speed: A fast website performs better and keeps users engaged. Regularly check your site’s speed after making edits.
- Seek feedback: Don’t hesitate to get opinions from your users! They may spot things you can improve.
Remember, the more tailored your site is to your audience, the better your chances of success!
Q6: What if I need help during the editing process?
A6: No worries! The Eduma theme comes with excellent support and documentation. you can also find helpful tutorials and forums online. If you hit a roadblock, consider reaching out to the community or even hiring a freelancer for specific tasks. There’s a wealth of resources out there—don’t hesitate to leverage them!
Q7: Is it worth the effort to edit my Eduma theme?
A7: Absolutely! Investing time in customizing your Eduma theme can yield significant returns. A well-edited website not only enhances your brand but also improves user experience, leading to higher engagement and increased enrollments. Imagine turning a visitor into a lifelong learner—all because you took the time to create a compelling online presence. It’s a win-win!
Conclusion: Editing the Eduma theme is not just about aesthetics; it’s about creating an immersive experience for your users. Take the plunge, customize, and watch your educational platform thrive!
—
Feel free to tweak any part of this Q&A to better fit your article’s needs!
In Summary
And there you have it! You’re now equipped with all the essential tips and tricks to edit the Eduma theme like a pro. Whether you’re looking to enhance your online learning platform or simply want to give your website a fresh look, the steps we’ve covered will pave the way for a stunning and functional site.
Remember, every detail counts, from customizing your headers to optimizing your layout. Don’t hesitate to experiment and let your creativity shine—this is your space, after all! If you run into any bumps along the way, just refer back to this guide; it’s here for you.
So, go ahead and dive into the world of Eduma editing. your users are going to love the new vibe, and who knows? You might just discover a hidden talent for web design along the way. Happy editing, and here’s to creating an engaging and dynamic learning experience! If you have any questions or need further assistance, feel free to reach out. Your journey doesn’t end here—let’s keep the conversation going!