Have you ever stumbled upon a website that offered helpful little hints when you hovered over certain words or phrases? these handy features, known as tooltips, can significantly enhance user experience by providing additional information without cluttering the page. If you’re running a WordPress site,you’re in luck! In this article,we’re going to explore three easy ways to add tooltips to your content,whether you prefer a free plugin for a quick setup or diving into some CSS for a more customized touch. No matter your skill level, by the end of this guide, you’ll be equipped with the knowledge to make your website not just more interactive but also more informative. Let’s get started and transform your WordPress pages into user-friendly resources!
Understanding Tooltips and Their Benefits for Your WordPress Site
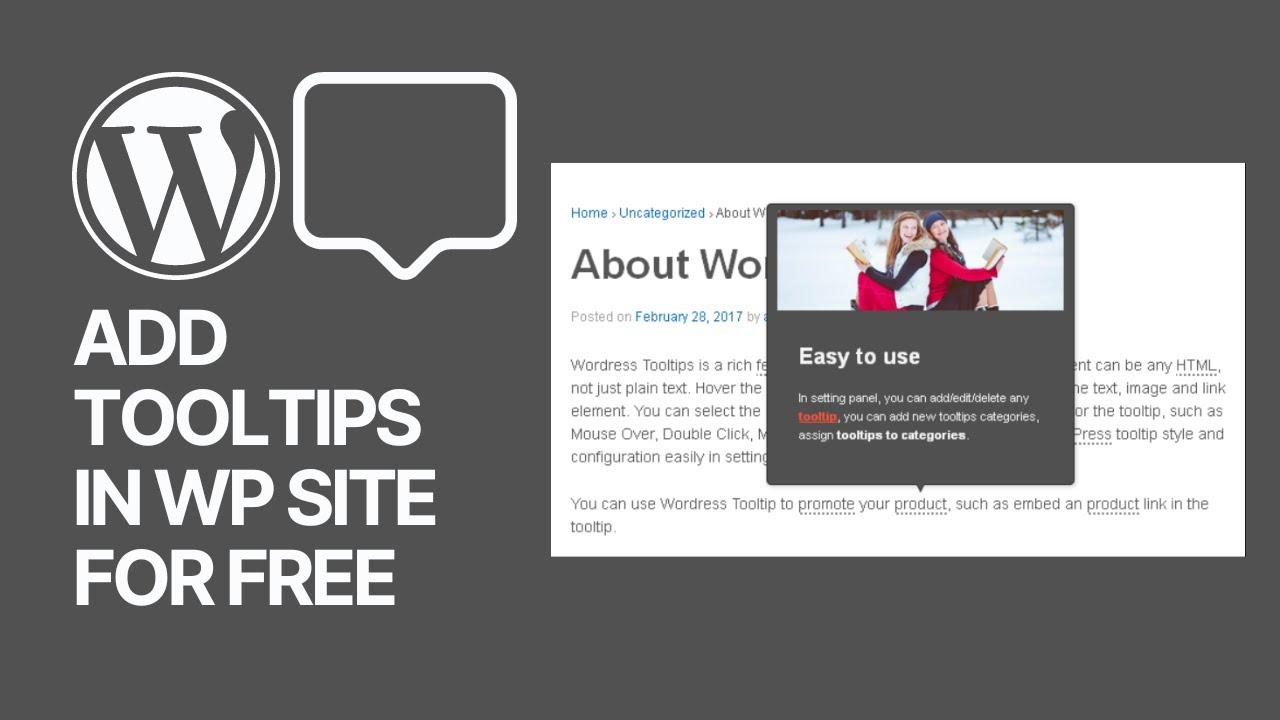
Tooltips are small, informative pop-ups that appear when a user hovers over or clicks on an element on your website. They serve as a helpful guide, offering additional context without overwhelming the user with too much information at once. By implementing tooltips on your WordPress site, you can significantly enhance user experience and make your site more interactive.
One of the primary benefits of tooltips is their ability to improve usability. They allow users to understand complex terms or functions without needing to navigate away from the current page. This keeps visitors engaged, reduces bounce rates, and can even lead to higher conversion rates. Imagine a scenario where a user is curious about a specific feature on your site; with tooltips, they can quickly learn more without the hassle of searching for additional information.
Another advantage is the potential for SEO enhancement. While tooltips themselves may not directly boost your search rankings, they can contribute to a better user experience, which search engines like Google prioritize. A well-structured website that provides valuable information quickly is more likely to rank higher in search results. Tooltips also encourage longer site visits as users explore the extra details you provide.
Moreover, tooltips offer an opportunity for branding. You can customize the appearance of your tooltips to align with your website’s aesthetic, using colors, fonts, and styles that reflect your brand identity. This not only makes your site visually appealing but also reinforces your brand’s message and professionalism.
| Tooltip Benefits | Description |
|---|---|
| Improved Usability | Provides quick access to additional information. |
| SEO Enhancement | Encourages better user engagement, affecting search rankings. |
| Branding Opportunity | Customizable styles that reflect your brand identity. |
Lastly, implementing tooltips can be done in various ways. whether through a free WordPress plugin or by adding custom CSS, you have options that fit your skill level and the specific needs of your site. By taking advantage of this simple yet effective feature, you can create a more informative and engaging habitat for your visitors.
Exploring Free Plugins for Effortless Tooltip Integration
When it comes to enhancing user experience on your WordPress site, tooltips can serve as a valuable resource. They provide context and additional information without cluttering your layout. Fortunately, there are numerous free plugins available that make adding tooltips a breeze. Let’s delve into some of the top options you can consider for effortless integration.
1. Tooltipy
This lightweight plugin allows you to create customized tooltips with ease. With a straightforward interface, Tooltipy enables you to:
- Customize colors and fonts
- Control the position of your tooltips
- Utilize HTML for advanced formatting
Whether you want to highlight specific terms or provide additional information on hover, Tooltipy makes it simple and effective.
2. WP Tooltips
WP Tooltips is another excellent option for those seeking flexibility. This plugin offers a user-friendly shortcodes feature that allows you to add tooltips anywhere on your site. Key highlights include:
- Easy-to-use shortcode generator
- Multiple styling options
- Compatibility with all themes
Its compatibility makes it an ideal choice for anyone looking to maintain a consistent look across their site.
3. CM Tooltip Glossary
If you have a lot of terms related to your niche, CM Tooltip Glossary is a fantastic plugin to consider. It turns your glossary items into interactive tooltips with these features:
- Automatic linking to glossary terms
- Full support for CSS customization
- SEO-friendly options
This plugin not only provides tooltips but also enhances your site’s SEO by creating a extensive glossary.
| plugin name | Key Feature | Ideal for |
|---|---|---|
| Tooltipy | Custom Styling | General Use |
| WP Tooltips | Shortcodes | Flexible Placement |
| CM Tooltip Glossary | Automatic Linking | Glossary Management |
Exploring these free plugins can significantly simplify the process of integrating tooltips into your WordPress site. Each option brings unique features to the table, ensuring you can find the right fit for your needs. So go ahead, give them a try, and elevate your site’s usability!
Step-by-Step Guide to Installing a Tooltip Plugin
Installing a tooltip plugin in wordpress is a straightforward process that can enhance the user experience on your website. Follow these simple steps to get your tooltip plugin up and running smoothly.
First, you’ll need to select a tooltip plugin that suits your needs. Some popular options include WP Tooltip, Simple Tooltips, and Qtip2.Here’s how to install your chosen plugin:
- Log into your WordPress dashboard.
- Navigate to Plugins > Add New.
- in the search bar, type the name of the tooltip plugin you have chosen.
- Once you find it, click Install Now.
- After installation, click Activate to enable the plugin on your site.
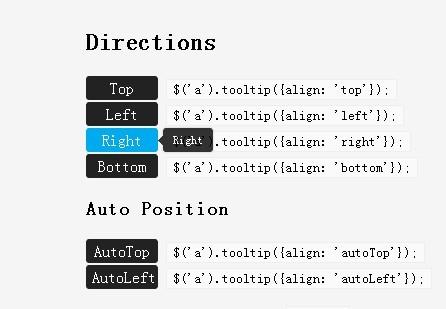
Next, you’ll want to configure the plugin settings to fit your design and functionality requirements. moast tooltip plugins offer customization options to adjust:
- Tooltip delay time
- Tooltip colors and fonts
- Positioning (top, bottom, left, right)
To access these settings, go to Settings in the dashboard, and look for the tooltip plugin you just installed.Each plugin will have its own interface, but look for a section that allows you to make adjustments.
after customizing your settings, you can start adding tooltips to your content. This is typically done using shortcodes or specific HTML attributes. For example:
| Action | Example |
|---|---|
| add a tooltip | [tooltip text="Your tooltip text here"]Your content[/tooltip] |
| Using HTML attributes | Hover over me! |
By following these steps, you’ll have a fully functional tooltip plugin in no time, adding valuable context and information to your website’s content.
Customizing Your Tooltip appearance with CSS
Customizing the appearance of your tooltips with CSS not only enhances their aesthetics but also helps them integrate seamlessly with your website’s design. With just a few lines of code,you can transform a basic tooltip into a visually appealing element that captures your visitors’ attention.
To start, you can target the tooltip class in your CSS. Here’s a simple structure to get you going:
.tooltip {
    position: relative;
    display: inline-block;
    cursor: pointer;
}

.tooltip .tooltiptext {
    visibility: hidden;
    width: 120px;
    background-color: #555;
    color: #fff;
    text-align: center;
    border-radius: 6px;
    padding: 5px 0;
    position: absolute;
    z-index: 1;
    bottom: 125%; /* Position above the tooltip */
    left: 50%;
    margin-left: -60px;
    opacity: 0;
    transition: opacity 0.3s;
}

.tooltip:hover .tooltiptext {
    visibility: visible;
    opacity: 1;
}
This snippet creates a simple tooltip effect. The tooltip text is hidden by default and becomes visible when the user hovers over the tooltip element. You can adjust the background color, width, and positioning according to your theme’s needs.Here are a few tips to enhance your tooltips:
- Color Palette: Choose colors that match your website’s branding for a cohesive look.
- Font Styles: Utilize web-safe fonts or Google fonts to maintain readability and style.
- Shadow Effects: Adding a slight box-shadow can give your tooltip a more three-dimensional look.
Moreover, if you want to provide additional context or information, consider using CSS transitions for a smoother experience. To implement this, you might want to add an animation effect on hover:
.tooltip .tooltiptext {
    transition: all 0.5s ease-in-out;
}
Lastly,if you’re looking for a quick reference on tooltip styles,here’s a simple comparison of different effects you can apply:
| Effect | Description |
|---|---|
| Fade | Softly fades in and out on hover. |
| Slide | Slides in from the top or side. |
| Bounce | Bounces subtly upon visibility. |
With these CSS customizations, you can create tooltips that are not just functional but also an attractive part of your website’s user interface. Experimenting with various styles will allow you to find the perfect look that resonates with your content and audience.
Enhancing User Experience with Effective Tooltip Content
Tooltips are a subtle yet powerful tool for enhancing user experience on your WordPress site. By providing contextual information without overwhelming users, they help clarify terms, explain functionalities, or direct attention to important features. when implemented correctly, tooltips can make your content more accessible and engaging.
Here are some key benefits of using effective tooltip content:
- Improved Clarity: tooltips can define complex terms or concepts, ensuring your audience fully understands your messaging.
- Increased Engagement: By offering extra insights without cluttering the interface, users are more likely to interact with your content.
- Enhanced Navigation: Utilize tooltips to guide users through your site, making it easier for them to find what they’re looking for.
To ensure your tooltips resonate with your audience, keep the content concise and focused. Here are some tips for crafting compelling tooltip content:
- Use simple language that aligns with your audience’s familiarity.
- Incorporate relevant examples to illustrate concepts when necessary.
- Keep it short; ideally, tooltips should be one or two sentences long.
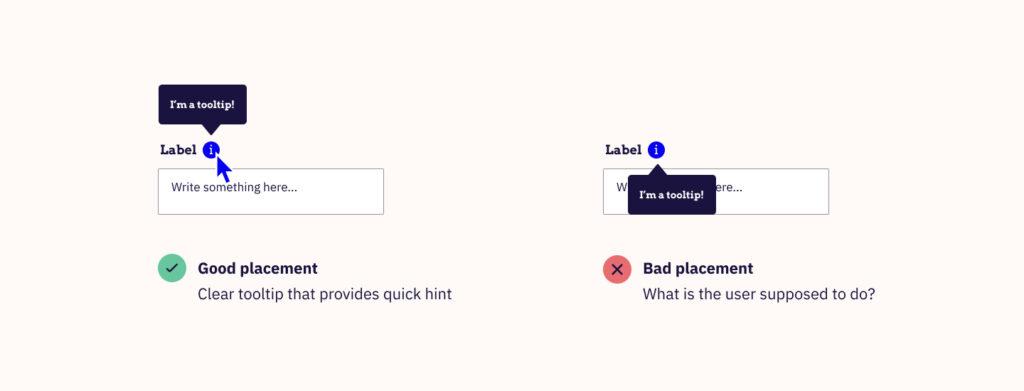
| Best Practices | Description |
|---|---|
| Positioning | Ensure tooltips appear in proximity to the relevant content for quick reference. |
| Timing | Display tooltips on hover or click to avoid information overload. |
| Styling | Use contrasting colors for visibility while ensuring they blend with your site’s design. |
Remember, the ultimate goal of tooltips is to provide value to your users.If you can make their journey through your content smoother and more informative, you’ll likely see reduced bounce rates and increased satisfaction. By investing time in crafting effective tooltip content, you’re not just elevating the user experience but also fostering a more informed audience.
Tips for Choosing the Right Tooltip Solution for Your Needs
When selecting the ideal tooltip solution for your wordpress site, several factors come into play that can significantly affect both user experience and functionality. It’s essential to consider your website’s overall design,the complexity of the tooltips required,and how they will enhance information delivery without overwhelming your visitors.
First and foremost, evaluate the design compatibility of the tooltip options you are considering.Tooltips should seamlessly blend with your website’s aesthetics, maintaining your brand’s visual identity.Look for solutions that allow customizable styles, such as background colors, font sizes, and border styles. This flexibility ensures that your tooltips not only serve a functional purpose but also enhance the look and feel of your site.
Next, contemplate the complexity and customization of the tooltip content. If your tooltips will contain rich text, images, or interactive elements, choosing a solution that allows for advanced formatting is crucial. A simple plugin might suffice for basic definitions or explanations, but for more dynamic content, consider options that support HTML or custom CSS. This will enable you to create engaging and informative tooltips that capture your audience’s attention.
Performance is another key consideration. Ensure that the tooltip solution you choose is lightweight to prevent any lag in loading times. An overly heavy plugin can slow down your website, negatively affecting user experience and SEO rankings. To help you assess the performance, here’s a simple table comparing the aspects of different tooltip solutions:
| Tooltip Solution | Customization | Performance | Ease of Use |
|---|---|---|---|
| Free Plugin A | Basic | Good | User-friendly |
| Free Plugin B | Advanced | Moderate | Moderate |
| CSS Method | highly Customizable | Excellent | Requires Coding Skills |
Lastly, don’t overlook the importance of support and updates. A good tooltip plugin should come from a reputable source that offers regular updates and reliable customer support. This can save you time and headaches down the line, ensuring that your tooltip feature runs smoothly as you update your WordPress site. Thoroughly review user feedback and support forums to gauge the level of assistance provided for each solution.

Troubleshooting Common Tooltip Issues on WordPress
Even with the best tools and methods, you might encounter some issues when adding tooltips in WordPress. Here are common problems and solutions to ensure your tooltips display perfectly and enhance your site’s user experience.
1. Tooltip Not Displaying
If your tooltip is not showing up, it could be due to several factors:
- JavaScript errors on the page – Check the console for any error messages.
- Conflicting plugins – Disable other plugins one by one to identify any conflicts.
- CSS visibility – Ensure that custom styles are not hiding the tooltip.
2. Tooltips Overlapping or Misaligned
Sometimes tooltips may overlap or not align correctly with the associated elements. Here’s how to troubleshoot:
- Adjust the positioning properties in your CSS, such as
top,left,right, andbottom. - review the z-index values to ensure the tooltip appears above other elements.
- Test the tooltip on different screen sizes and browsers to check for responsive issues.
3. Tooltip Display Duration
If tooltips disappear too quickly or stay too long, consider adjusting the display duration in your JavaScript settings. A simple adjustment can make a significant difference:
| Duration Type | Suggested Time (ms) |
|---|---|
| Hover Duration | 500-1000 |
| Fade Out Duration | 300 |
| Auto Hide Duration | 3000 |
By addressing these common issues,you can ensure that your WordPress tooltips function effectively,providing valuable information without detracting from the user experience. Remember to regularly test your tooltips after making changes to your site or updating plugins.
Maximizing the Impact of Tooltips for Increased Engagement
Tooltips are a powerful yet frequently enough underutilized feature that can significantly enhance user engagement on your WordPress site. When implemented effectively, they provide additional context and information without cluttering the interface, allowing visitors to interact with your content more meaningfully. Here are some strategies to maximize the impact of tooltips:
- Keep it Concise: Aim for brevity. The best tooltips deliver quick bites of information that answer questions or clarify terms without overwhelming the reader.
- Use Clear Language: Avoid jargon and complex terms. Your tooltip should be easily understood by anyone, regardless of their familiarity with your content.
- Visually Distinct: Style your tooltips to make them stand out. A contrasting color or unique hover effect can draw attention and encourage users to engage with them.
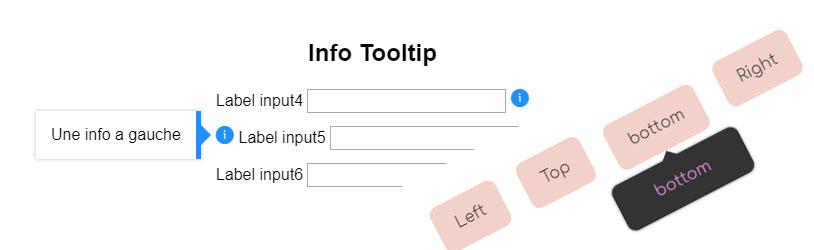
Another effective approach is to strategically place tooltips throughout your site. This can guide users through complex processes, highlight key features of your products, or provide supplementary information that enhances the overall user experience. Consider the following placements:
| Placement | Purpose |
|---|---|
| Form Fields | provide explanations for input requirements |
| Product Descriptions | Offer additional details about features |
| Blog Posts | Define technical terms or concepts |
additionally, leveraging tooltips for interactive elements can lead to higher user engagement. For example, if you have a tutorial or a guide, using tooltips to explain each step can keep users focused and informed as they progress. This not only enhances understanding but also fosters a sense of accomplishment as they interact with each tooltip.
Lastly, don’t forget to analyze user behavior. Use analytics tools to track how often tooltips are engaged with and which ones are the most effective. A/B testing different tooltip styles and placements can provide insights that inform your strategy, allowing you to continuously improve the user experience on your site.
Final Thoughts on Implementing Tooltips in WordPress
Implementing tooltips in WordPress can significantly enhance the user experience on your site. By providing additional context or information without cluttering the page, tooltips help visitors navigate your content more efficiently. Whether you choose to use a free plugin or opt for a CSS solution, the flexibility and ease of integration make these options appealing for both beginners and seasoned developers.
When considering your approach,think about the following benefits:
- User Engagement: Tooltips can make your content more interactive. Users are more likely to engage with elements that provide instant information.
- Accessibility: Properly configured tooltips can aid users who may struggle to understand certain terms or concepts,improving overall accessibility.
- Branding Opportunity: Custom tooltips can be styled to reflect your brand’s identity, creating a cohesive design throughout your site.
Here’s a quick comparison of the two popular methods for adding tooltips:
| Method | Pros | Cons |
|---|---|---|
| Free Plugin |
|
|
| CSS Styling |
|
|
Ultimately, the choice between a plugin or CSS depends on your specific needs and skill level. If you’re looking for a quick and straightforward solution, a plugin might be the way to go. Conversely, if you want complete control over the design and functionality, diving into CSS can yield a more tailored experience.
As you move forward with implementing tooltips,remember to keep user experience at the forefront. Ensure that your tooltips are not only informative but also intuitively placed, so they enhance the flow of your content rather then detract from it. With thoughtful execution, tooltips can become a valuable asset in your WordPress toolkit.
Frequently Asked Questions (FAQ)
Q&A: How to add a WordPress Tooltip in 3 Ways: Free Plugin or CSS
Q: What exactly is a tooltip in WordPress, and why should I use one?
A: Great question! A tooltip is a small pop-up box that appears when a user hovers over or clicks on an element, like a word or image. It provides additional information without cluttering your page. Using tooltips can enhance user experience by offering explanations or definitions, making your content more engaging and informative.
Q: can I add tooltips to my WordPress site for free?
A: Absolutely! There are several free plugins available that make adding tooltips a breeze. If you prefer a quick and easy solution without diving into code, a plugin is the way to go!
Q: What are the three ways to add tooltips on my WordPress site?
A: You’ve got it! You can use:
- Free Plugins: These are user-friendly and come with various customization options.
- CSS: If you’re cozy with a little coding, you can create tooltips using CSS for a more tailored look.
- Page Builders: If you’re using a page builder like Elementor or WPBakery, they often have built-in tooltip features that you can easily implement.
Q: I’m not tech-savvy. which method do you recommend for me?
A: If coding isn’t your thing, I highly recommend starting with a free plugin. They usually have straightforward interfaces and won’t require you to touch any code. Just install, configure, and enjoy tooltips on your site!
Q: What are some popular free plugins for tooltips?
A: A few crowd favorites include WP Tooltips, Tooltips Pro, and Simple Tooltips.Each of these plugins offers unique features,so it’s worth exploring a couple to find the one that fits your needs best!
Q: How do I add tooltips using CSS? Isn’t that complex?
A: While it might sound a bit daunting,adding tooltips with CSS is pretty simple once you get the hang of it! If you’re willing to learn a bit,you can create custom tooltips that match your site’s branding perfectly. Plus, there are tons of tutorials online that can guide you step-by-step.
Q: I’m using Elementor. Can I still add tooltips easily?
A: Definitely! Elementor has a built-in feature for tooltips. You can add them to any element by simply entering your tooltip text in the settings. It’s user-friendly and doesn’t require any coding skills!
Q: What if I want to style my tooltips differently? Can I customize them?
A: Yes! Whether you’re using a plugin or CSS, customization is usually an option.With plugins, you can often choose colors, fonts, and sizes directly in the settings. If you go the CSS route, you have full control over the styling, allowing you to create something that fits your website’s look perfectly.
Q: What’s the takeaway? Is it worth adding tooltips to my site?
A: Absolutely! Adding tooltips can provide your visitors with helpful context, improve navigation, and enhance their overall experience. It’s a small addition that can make a big difference. Plus, with the options available—whether you choose a plugin or CSS—there’s an easy and effective way to implement them on your site. So why not give it a try? Your users will thank you!
Insights and Conclusions
And there you have it! Whether you opt for a free plugin or dive into some custom CSS, adding tooltips to your WordPress site can enhance user experience and keep your visitors engaged.Remember, tooltips are a subtle yet powerful way to provide extra information without cluttering your content.
If you’re looking for a quick and easy solution, a plugin might be your best bet. But if you love the idea of customizing your site to align perfectly with your brand, a little CSS can go a long way.
So, why not give it a try? Experiment with the options we’ve discussed and see how tooltips can breathe new life into your content. Your readers will appreciate the added clarity, and you’ll love the polished look they bring to your site. Happy tooltip-ing! If you have any questions or want to share your own experiences, drop a comment below—we’d love to hear from you!