Are you feeling a bit overwhelmed by the visual clutter on your WordPress site? You’re not alone! many bloggers and website owners want to create a clean and professional look, and sometimes that means hiding the featured images that can distract from your content. Whether you’re looking to streamline your blog posts or simply want to showcase your writing without the distraction of images, we’ve got you covered. In this article, we’ll explore two easy methods to hide featured images in WordPress, so you can regain control of your site’s appearance.Trust us, it’s simpler than you think, and soon you’ll have a polished, eye-catching website that highlights your words—without any visual distractions! Let’s dive in and transform your site together!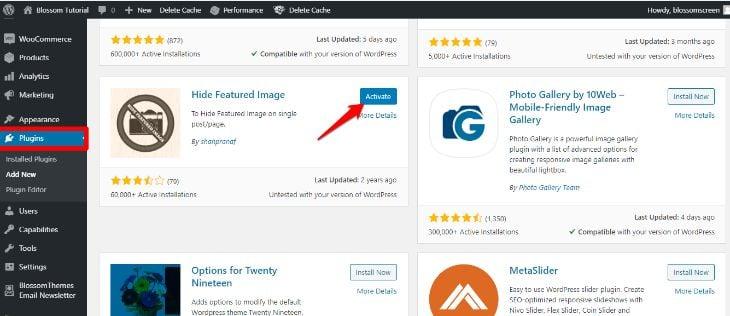
Understanding the Need to Hide Featured images in WordPress
In the world of WordPress, the featured image is often one of the first elements visitors notice when they land on a post. It serves as a visual representation of the content and can significantly impact the overall aesthetic of your site. However, there are times when hiding the featured image may be more beneficial than showcasing it.Understanding this necessity can help you enhance user experience and streamline your site’s design.
There are several reasons why you might choose to hide featured images:
- Improved Readability: In certain specific cases, a bold featured image may distract readers from the core content. Hiding it can help maintain focus on the text, especially in long-form articles.
- consistent Theme: If your site has a specific design theme, a featured image that doesn’t align can disrupt the visual flow. Removing it can create a more cohesive look.
- Enhanced Mobile Experience: On mobile devices, screen space is limited.Hiding images can make navigation smoother and content more accessible.
Furthermore, your audience may have varying expectations based on the type of content you are presenting. Such as, a news site may benefit from a minimalistic design, whereas a photography portfolio thrives on visual appeal. Understanding these nuances can guide your decision to hide featured images.
It’s also important to note that hiding a featured image does not mean it is irrelevant.It can still play a role in SEO, social sharing, and other behind-the-scenes functions even if it isn’t displayed. Therefore, you should consider how you can utilize these images in other ways, such as in the media library or for social media promotions.
Ultimately, whether you choose to showcase or hide featured images, the key is to prioritize user experience and ensure that your site aligns with your intended message. By doing so, you create a more engaging platform that resonates with your audience.
Exploring the Impact of Featured Images on User Experience
Featured images play a crucial role in shaping the overall user experience on a WordPress site. They serve not just as visual elements but also set the mood and tone for the content that follows. When done right, a featured image can draw visitors in, encouraging them to read further and engage with your material.However, there are instances where you might want to hide these images—perhaps to maintain a minimalist design or to keep the focus solely on the text.
One of the important benefits of adjusting or hiding the featured image is the ability to tailor the user experience.By doing so, your site can achieve a clean and professional look that appeals to a specific audience. Consider these key points:
- Enhanced Readability: Without the distraction of images, visitors can focus more on the content itself.
- Faster Load Times: Reducing image sizes or eliminating them can improve site performance, leading to a better user experience.
- Consistent Aesthetics: Hiding featured images can definitely help maintain a uniform appearance across various page types, aligning with your brand’s identity.
When contemplating hiding a featured image, it’s critically important to also consider how this change affects the overall design. A well-planned layout can ensure that removing images does not lead to a stark or uninviting space. Here’s a simple table illustrating design alternatives when opting to hide featured images:
| Design Element | Impact |
|---|---|
| White Space | Creates a clean and modern look, enhancing focus. |
| Text Emphasis | Highlights the content, encouraging deeper engagement. |
| Consistent Colour Schemes | maintains brand identity, offering a cohesive experience. |
Ultimately, the decision to hide featured images should align with your goals for user experience. By presenting content in a way that resonates with your audience, your likely to see increased engagement and satisfaction. So, whether you choose to keep them or hide them, understanding their impact will help you create a more intentional and user-focused web presence.

Method One: Using Simple CSS to Conceal Your Featured Images
Hiding featured images in WordPress using CSS can be a straightforward solution, especially if you want to maintain a clean aesthetic without the clutter of images. The beauty of this method lies in its simplicity and effectiveness. With just a few lines of CSS,you can conceal featured images while still keeping them in the backend for SEO purposes.
To begin, you’ll need to access the WordPress customizer or your theme’s stylesheet (style.css). Here’s a speedy guide on how to implement this:
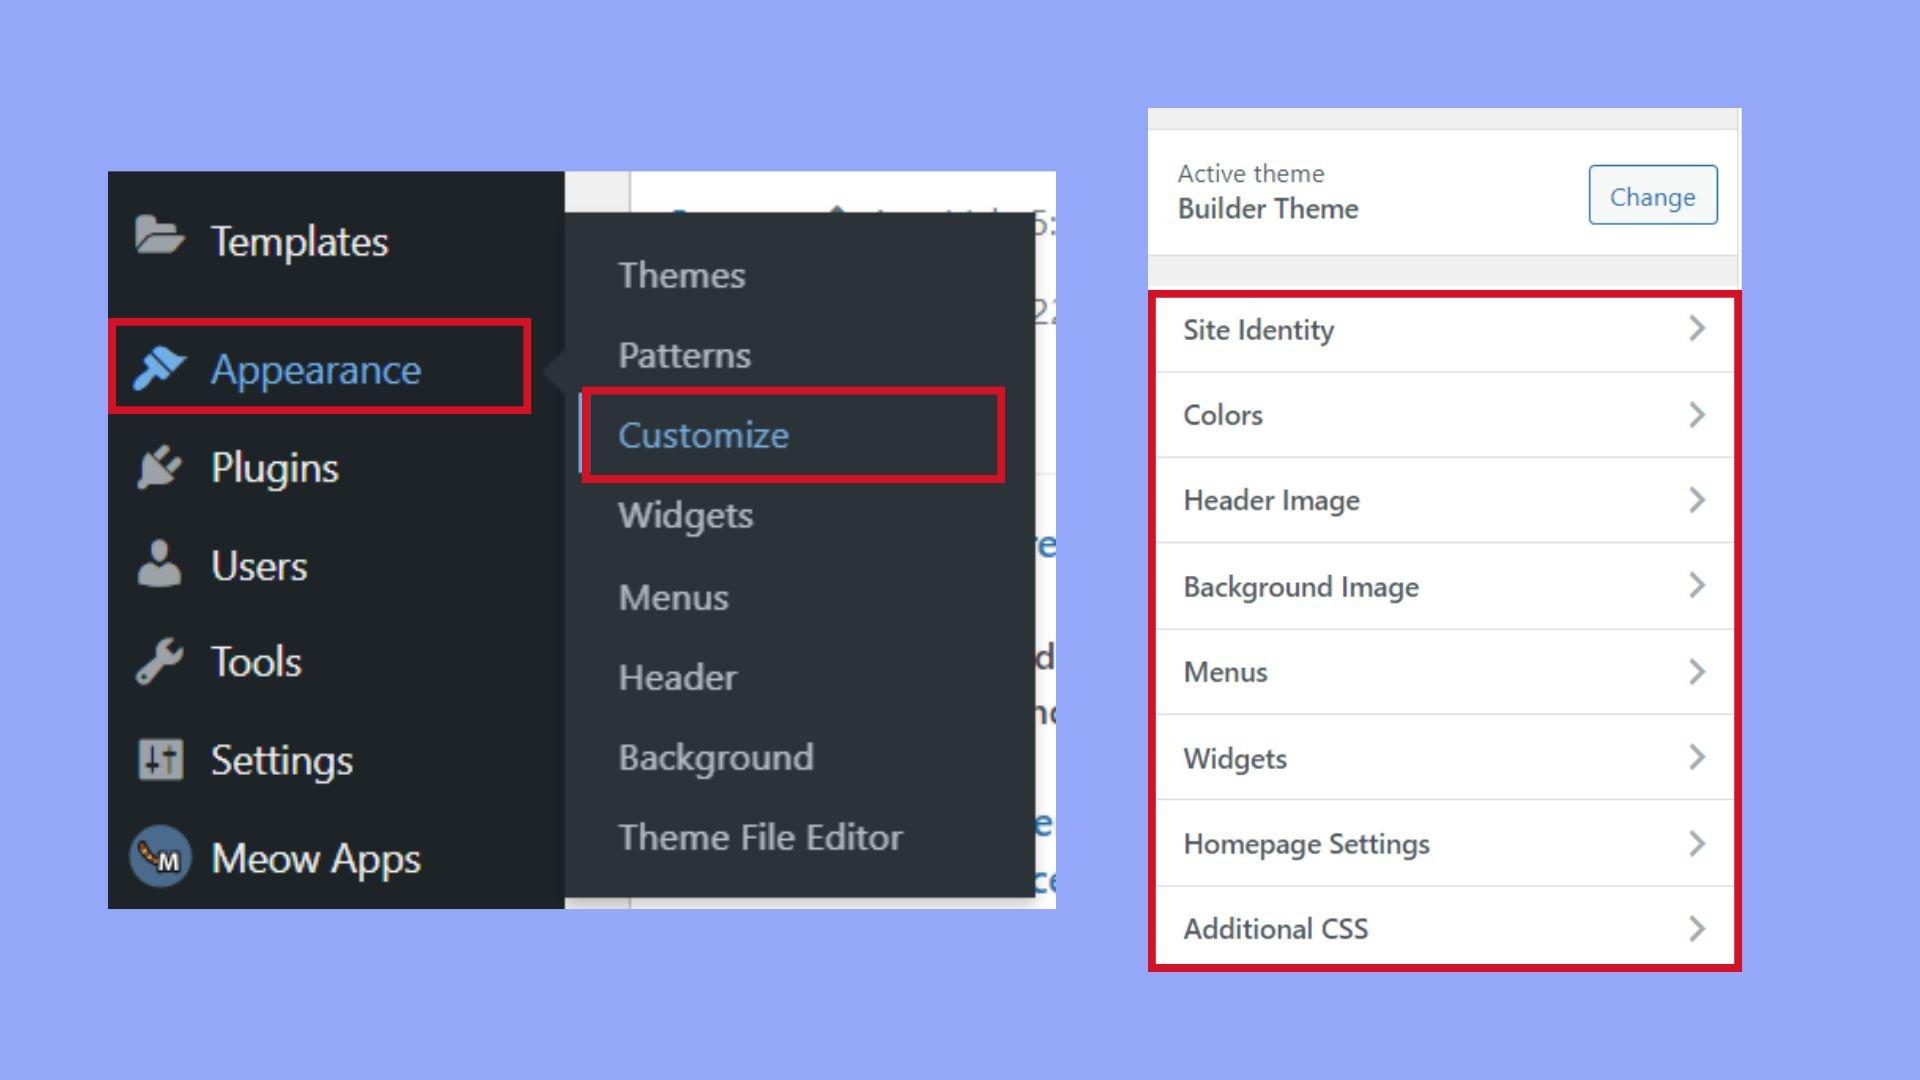
- Navigate to Appearance > Customize.
- Select additional CSS.
- Paste the following CSS code:
/* Hide featured images */
.post img.attachment-post-thumbnail {
    display: none;
}
This simple snippet targets the featured images by their class and hides them from view. You can further customize this code based on your theme or specific needs. For example, if you want to hide featured images only on specific pages or post types, you could use conditional tags in your CSS.
Here’s a quick table to illustrate how different conditions can be applied:
| Condition | CSS Code Example |
|---|---|
| hide on all posts | .post img.attachment-post-thumbnail { display: none; } |
| Hide on a specific category | .category-your-category img.attachment-post-thumbnail { display: none; } |
| hide on specific pages | .page-id-2 img.attachment-post-thumbnail { display: none; } |
Apply these styles thoughtfully, as they can greatly enhance user experience by decluttering your page layout. Remember, the featured images will still exist in the media library, allowing you to leverage them for other purposes such as social sharing or SEO without showing them on the front end. With this simple CSS method, you can tailor the visual presentation of your WordPress site efficiently.
Step-by-Step Guide to Implementing CSS for Hidden Images
Implementing CSS for Hidden Images
If you’re looking to hide your featured images in WordPress without altering your theme files, CSS is a powerful tool that can help you achieve this in a few simple steps. Whether you want to keep your layout clean or simply emphasize other content, utilizing CSS allows for flexibility and ease of use. here’s a straightforward guide to get you started.
First, you’ll need to access the custom CSS section of your WordPress site. Follow these steps:
- Log in to your WordPress dashboard.
- Navigate to Appearance > Customize.
- Look for the Additional CSS option in the Customizer.
Once you’re in the Additional CSS area,you can add the code snippet to hide the featured images throughout your site. Here’s a simple CSS rule you can use:
    .post-thumbnail {
        display: none;
    }
This line of code targets the class typically assigned to featured images, effectively hiding them from view. But what if you only want to hide images on specific pages or posts? You can achieve this by adding more specific CSS selectors. Such as:
    .single-post .post-thumbnail {
        display: none;
    }
In the above example, the featured images will only be hidden on single post pages. adjust the selectors as needed based on your theme’s HTML structure. If you’re unsure of the classes used by your theme, you can inspect the elements using your browser’s Developer Tools.
Table of Common CSS Classes for Featured Images
| Element | CSS Class |
|---|---|
| Post Thumbnail | .post-thumbnail |
| Featured Image | .featured-image |
| Single Post | .single-post |
With these tips, you can efficiently manage the visibility of featured images on your WordPress site. Remember to publish your changes after adding the CSS, and always check your site on various devices to ensure everything looks as intended. Happy styling!

Method Two: Leveraging Plugin Solutions for Effortless Hiding
If you’re looking for a quick and hassle-free way to hide the featured image on your WordPress site, plugin solutions can be your best friend. There are numerous plugins designed specifically to give you more control over your site’s appearance without diving into code. Here’s how you can leverage these tools for effortless hiding.
One of the most user-pleasant options is the Hide Featured Image plugin. This lightweight tool allows you to easily toggle the visibility of your featured images on posts or pages. Here’s how to get started:
- Install the Hide Featured Image plugin from the WordPress plugin repository.
- Activate the plugin through your WordPress admin dashboard.
- Navigate to the post or page where you want to hide the featured image.
- Locate the new option that appears in the editor for hiding the featured image.
- Check the box to hide the image and save your changes.
Another great option is the Custom Post Type UI plugin, which allows for even more flexibility. This plugin enables you to create custom post types and control various display options, including featured images across different post types. Here’s a simple guide:
| Step | Description |
|---|---|
| 1 | Install and activate the custom Post Type UI plugin. |
| 2 | Create a custom post type where you can control visibility settings. |
| 3 | Go to the settings for that post type and toggle off the featured image option. |
Using plugins not only makes it easier to manage visibility settings but also provides you with a range of customization options that can enhance your site’s overall design. whether you’re a beginner or a seasoned WordPress user, these plugins can save you time and ensure your site looks exactly how you envision it.

Top Recommended Plugins to Hide Featured Images Seamlessly
If you’re looking for an easy and efficient way to hide featured images in your WordPress site, several plugins can definitely help you achieve that without any hassle. These plugins not only simplify the process but also offer additional features that can enhance your website’s functionality.
Here are some of the best plugins that can definitely help you hide featured images seamlessly:
- Hide Featured Image: This plugin allows you to hide the featured images on specific posts or pages with just a click. It’s user-friendly and doesn’t require any coding knowledge.
- WP Hide Post: With this plugin, you can manage visibility settings for posts, pages, and media. You can easily hide featured images, banners, or any other media elements from appearing on the front end.
- content Control: A powerful plugin that provides granular control over what content is displayed to users. You can hide featured images based on user roles or specific conditions.
Each of these plugins provides intuitive interfaces that make it easy to manage your featured images. Additionally, they can integrate with other essential WordPress plugins to enhance your site’s overall performance and user experience. Here’s a quick comparison to help you decide:
| Plugin Name | Ease of Use | Additional Features |
|---|---|---|
| Hide Featured Image | Very Easy | Quick toggling |
| WP Hide Post | easy | Visibility control |
| Content Control | Moderate | User role restrictions |
Using any of these plugins will not only streamline the process of hiding featured images but will also give you greater flexibility in managing your site’s content. With their simple installation and customization options, you can ensure a clean and visually appealing layout that aligns with your design preferences.
Ensuring Your Content Still Shines Without Featured Images
When it comes to crafting compelling content on your WordPress site, the absence of a featured image doesn’t have to detract from its appeal. In fact, many successful blogs thrive without relying on visuals to grab attention. Here’s how to ensure your text remains engaging and impactful.
First and foremost, focus on your headlines. They are the first thing your audience sees, and a well-crafted headline can captivate readers and encourage them to delve into the content. Consider using intriguing questions, bold statements, or even humor to pique interest. For example:
- “what If You Could Do More With Less?”
- “Unlocking Secrets: The Real Story Behind…”
- “Why Most People Get It Wrong About…”
Another effective strategy is to enhance your body text. Without a featured image, you’ll want to ensure that your writing is not only informative but also engaging. Use short paragraphs, bullet points, and subheadings to break up your text and make it more digestible.this will keep readers on the page longer, regardless of the lack of visual elements.
Consider incorporating call-to-action (CTA) phrases strategically throughout your content. Encourage interaction and engagement by prompting readers to comment, share, or explore related topics. Phrases like “Join the conversation below!” or “Did this resonate with you? Let us know!” can effectively boost engagement metrics.
| Engagement Tips | Effective Techniques |
|---|---|
| Headlines | Use intriguing questions or bold statements |
| Body text | Short paragraphs & bullet points |
| CTAs | Encourage comments and sharing |
Lastly, don’t underestimate the power of SEO optimization. Without featured images, your content should make the most of keywords, meta descriptions, and alt text to ensure visibility. This allows your work to shine brightly in search engines, attracting more visitors to your site regardless of the visual elements.
Testing Your Changes: How to Make Sure Everything Looks Great
Once you’ve implemented your changes to hide the featured image in WordPress, it’s crucial to ensure everything appears as intended across different devices and browsers. Begin by clearing your cache to see the latest updates. Caching plugins often store an older version of your site, so this step is essential for a fresh look at your changes.
Next, perform a thorough review of your website:
- Desktop View: Check the layout on various screen resolutions to confirm that the absence of the featured image doesn’t disrupt the overall design.
- Mobile Responsiveness: Test your site on mobile devices to ensure that the remaining content is still engaging and easy to navigate.
- Cross-browser Testing: Verify compatibility across popular browsers like Chrome, Firefox, and Safari. A feature that looks great in one browser may not render properly in another.
To streamline your testing, consider utilizing developer tools available in most browsers. right-click on your webpage and select “Inspect” to view how elements are displayed in real-time. This can help identify any discrepancies that might need addressing.
If you’ve modified your theme’s CSS, it’s wise to check for any unintended side effects. Create a simple table to compare the before and after states of your design elements, focusing especially on spacing, alignment, and font styles.
| Element | Before Change | After Change |
|---|---|---|
| Featured Image Display | Visible | Hidden |
| content Spacing | Too close | Well-spaced |
| overall Layout | Cluttered | Clean |
gather feedback from users or colleagues who view the site. A fresh set of eyes can provide valuable insights and help catch any issues you might have overlooked. Engaging with your audience not only improves user experience but also fosters a sense of community around your content.
Final Thoughts on Customizing Your WordPress Experience
Customizing your WordPress experience can significantly impact how your content is perceived by your audience. While hiding the featured image might seem like a minor adjustment, it can lead to a cleaner, more focused presentation of your posts. This approach allows your readers to engage with your content without distractions, ensuring that the primary message shines through.
when considering customization options, think about:
- Branding: ensure that your website reflects your brand identity. A clutter-free layout allows for a more cohesive visual representation.
- User Experience: Streamlining content can lead to better readability and increased retention of your audience’s attention.
- Flexibility: Experiment with different methods of hiding featured images to see what resonates best with your visitors.
Additionally, take advantage of WordPress’s built-in customization features. You can tweak your theme settings or add custom CSS to achieve the desired look without compromising functionality. This adaptability is one of the many reasons WordPress remains a popular choice for bloggers and businesses alike.
| Method | Ease of Use | Customization Options |
|---|---|---|
| CSS Method | Easy | Basic to Advanced |
| Plugin Method | Very Easy | limited to Plugin features |
Ultimately, the ability to customize your site according to your preferences not only enhances your content but also establishes a unique identity for your digital presence. Keep experimenting with different methods and tools available to you, ensuring that your website remains both functional and aesthetically pleasing. The more you refine your approach, the more likely you are to create a captivating experience that keeps visitors coming back for more.

Empowering Your Design Choices: Take Control of Your Content
When it comes to customizing your WordPress site, one of the simplest yet most impactful decisions you can make is controlling the visibility of your featured images. Whether you want a clean look for your blog posts or aim to focus your audience’s attention on the text, hiding the featured image can be a game-changer. Here are two easy methods to help you achieve the desired appearance.
Method 1: Using CSS to Hide the Featured Image
One of the quickest ways to hide your featured images is by adding a bit of custom CSS. This method is perfect if you want flexibility and the power to control visibility across multiple posts. Here’s how you can do it:
- Go to your wordpress dashboard.
- Navigate to Appearance > Customize.
- Find the Additional CSS section.
- Paste the following code:
.post-thumbnail {
    display: none;
}
this snippet will hide the featured image for all posts across your site. If you want to target specific posts, you can modify the selector accordingly.
Method 2: Using a Plugin
If you’re not comfortable with coding, there are plugins that simplify this process. A popular choice is the Hide Featured Image plugin. Here’s how to use it:
- Install and activate the plugin from the WordPress Plugin Repository.
- Once activated, navigate to the post editor of the post where you want to hide the featured image.
- Look for the “Hide Featured Image” option and check the box.
This method is user-friendly and allows you to selectively hide the featured image on individual posts without affecting your other content.
Comparison of Methods
| Method | Technical Skill Required | Effect on Posts |
|---|---|---|
| CSS | Intermediate | Affects all posts globally |
| Plugin | Beginner | Selectively affects individual posts |
Choosing the right method depends on your comfort level with technology and the specific needs of your website. Both approaches provide a pathway to streamline your design and empower your content presentation.
Frequently Asked Questions (FAQ)
Q&A: How to Hide Featured Image in WordPress (2 Easy Methods)
Q: Why would I want to hide the featured image on my WordPress posts?
A: Great question! Hiding the featured image can be useful for various reasons. Perhaps you want a cleaner look for your blog, or maybe the image is irrelevant for certain posts. By hiding it, you can focus more on your content and improve the overall aesthetics of your site.
Q: what are the two easy methods to hide the featured image?
A: The two simple methods are:
- Using Custom CSS: this method involves adding a small snippet of CSS code to your theme settings.
- Using a Plugin: If you’re not comfortable with code, this method is perfect for you! There are several user-friendly plugins available that can do the job with just a few clicks.
Q: Can you explain how to use Custom CSS to hide the featured image?
A: Absolutely! Just go to your WordPress dashboard, navigate to Appearance > Customize, and then click on Additional CSS. Here, you can add the following code:
css
.post-thumbnail {
    display: none;
}
This will hide the featured image on all your posts. It’s quick, easy, and reversible if you ever change your mind!
Q: what if I want to hide the featured image on specific posts only?
A: You can do this by using a conditional statement in your CSS or by using a plugin, which I’ll explain in a second. If you’re coding,you’d adapt your CSS to target only those specific posts using their unique ID. However, if that sounds intricate, stick around for the plugin method!
Q: How do I use a plugin to hide the featured image?
A: Simply head over to the Plugins section in your dashboard, search for “Hide Featured Image,” and install a suitable plugin. once activated, the plugin will typically add options in your post editor where you can choose to hide the featured image with a checkbox.It’s as easy as that!
Q: Are there any downsides to hiding the featured image?
A: While hiding the featured image can improve your site’s appearance, keep in mind that these images are often used for SEO and social sharing purposes.Without them, your posts might not stand out as much when shared on social media. It’s all about finding the right balance for your site’s goals!
Q: Can I easily revert these changes if I decide to show the featured images again?
A: Yes, absolutely! If you used custom CSS, you can simply remove the code from the additional CSS area. If you used a plugin, just go to the plugin settings and uncheck the option to hide the featured image. It’s straightforward and flexible!
Q: Is there anything else I should consider before hiding the featured image?
A: Definitely! Think about your overall design and branding. Consider how your readers engage with your content. If visuals are a significant part of your storytelling, you might want to retain them. However, if you prioritize text and have a minimalistic approach, hiding them could be a winning strategy!
Q: Where can I learn more about WordPress customization?
A: There are tons of resources available! You can check out the official WordPress support forums, tutorials on YouTube, or blogs dedicated to wordpress tips. The more you explore, the more you’ll be able to customize your site to fit your vision perfectly!
Q: Ready to give it a try?
A: Absolutely! With these two easy methods, you’re well on your way to tailoring your WordPress site to your liking. Go ahead and experiment—you might just discover a new aesthetic that enhances your readers’ experience!
insights and Conclusions
and there you have it! Hiding your featured image in WordPress doesn’t have to be a daunting task. Whether you opted for the simple CSS method or the user-friendly plugin approach, you now have the tools to customize your site exactly how you want it.
Remember, your website is your digital canvas—every detail matters! if you want to create a specific look or feel for your posts, don’t hesitate to experiment with these methods. And hey, if you found this article helpful, why not share it with a fellow WordPress enthusiast? They might appreciate the tips as much as you did!
Got any questions or need further assistance? Drop a comment below! we love hearing from you. Happy blogging, and may your WordPress journey be filled with creativity and success!