Are you tired of running into that pesky ”memory tired” error on your wordpress site? You’re not alone! Many WordPress users face this frustrating issue,especially when they’re trying to upload large images or install new plugins. But fear not! We’ve got you covered. In this article, we’ll dive into four easy methods to increase your WordPress memory limit, all expert-tested and ready for 2025.Whether you’re a seasoned developer or a novice blogger, these straightforward solutions will help you boost your site’s performance and keep those errors at bay. so, let’s roll up our sleeves and get your WordPress site running smoother than ever!
Understanding the Importance of WordPress Memory Limit
In the world of WordPress, the memory limit is a crucial factor that directly impacts your website’s performance and functionality. When your WordPress site runs out of memory, it can lead to various issues, such as errors, slow loading times, or even crashes. Understanding this limit is essential for both site administrators and developers, as it determines how much memory is allocated to PHP processes.
By default, WordPress sets a memory limit, which can be adequate for basic sites.However,as your website grows—whether through increased traffic,more plugins,or complex themes—you may find that the default memory allocation simply isn’t enough. This is where the importance of optimizing your memory limit becomes apparent.Increasing your memory limit can enhance:
- Site Speed: A higher memory limit can reduce load times, improving user experience.
- Plugin functionality: Many plugins require additional memory to function effectively, especially caching and optimization plugins.
- Error Prevention: A sufficient memory limit helps prevent common errors such as “memory exhausted” warnings.
Moreover, understanding the memory limit allows you to make informed decisions about which themes and plugins to use. Some themes are resource-intensive and demand more from your server. By knowing your memory limits, you can choose wisely and avoid sluggish performance.
Another point to consider is the server environment. Shared hosting plans frequently enough set lower memory limits than VPS or dedicated servers. If you’re serious about running a high-performance site, upgrading to a hosting plan that offers more memory can be a game-changer. Below is a speedy comparison of typical memory limits across different hosting types:
| Hosting Type | Typical Memory Limit |
|---|---|
| Shared Hosting | 128 MB |
| VPS Hosting | 256 MB – 512 MB |
| Dedicated Server | 1 GB or more |
Ultimately, understanding the importance of the WordPress memory limit empowers you to maintain a robust, efficient, and user-kind website. By identifying when and how to increase this limit, you set your site up for success, ensuring it can handle everything from daily traffic spikes to complex operations without a hitch.
Signs Your WordPress Site Needs a Memory Boost
Is your WordPress site feeling sluggish? Here are some telltale signs that it might be time for a memory boost:
- Frequent Error Messages: If you’re encountering the dreaded “Allowed memory size exhausted” error, it’s a clear indication that your site needs more memory to function smoothly.
- Slow Loading Times: A site that takes ages to load can frustrate visitors and impact your search engine rankings. If you notice that your pages are lagging, it’s likely a memory issue.
- Inability to Update Plugins and Themes: If you’re struggling to update your WordPress plugins or themes, this might be a symptom of inadequate memory.
- Unresponsive Admin Dashboard: an admin area that freezes or takes too long to respond can hinder your productivity. This is often a sign that your WordPress installation requires additional resources.
- High Resource Consumption: use a monitoring tool to check your resource usage. If you see consistently high memory usage, it’s time to consider increasing your limits.
Addressing these issues can vastly improve your site’s performance and user experience. Remember, a well-optimized site not only enhances user engagement but also contributes positively to your SEO efforts.
If you identify any of these signs, don’t hesitate to take action.Boosting your memory limit can be a simple yet effective solution, ensuring that your WordPress site runs as efficiently as possible.
Adjusting Memory Limit via wp-config.php for Maximum Impact
Adjusting the memory limit in WordPress through the wp-config.php file is a straightforward yet powerful way to enhance your site’s performance. This method is especially useful if you’re encountering “memory exhausted” errors or if your site is running slower than expected. Let’s dive into the steps to effectively modify this critical file.
First, you’ll need to access your site’s root directory through FTP or your hosting provider’s file manager. Once you’ve located the wp-config.php file, open it with a code editor. You’re looking for a spot just before the line that says /* That's all,stop editing! Happy blogging. */ here, you will add a simple line of code to boost your memory limit.
To do this, insert the following line:
define('WP_MEMORY_LIMIT', '256M');This example sets the memory limit to 256 megabytes, which is sufficient for most sites. If your site has heavy plugins or extensive media, consider increasing it to 512M or even 1024M, but be mindful of your server’s capacity.
Besides setting the limit, it’s essential to ensure that your hosting environment supports the memory increase. If you’re on shared hosting, your provider may impose restrictions. Here’s a quick checklist to follow:
- Consult with your hosting provider: Confirm that they allow memory limit changes.
- Check for conflicting plugins: Sometimes, certain plugins consume excessive memory.
- Monitor performance: Use tools like Query Monitor to assess memory usage pre- and post-change.
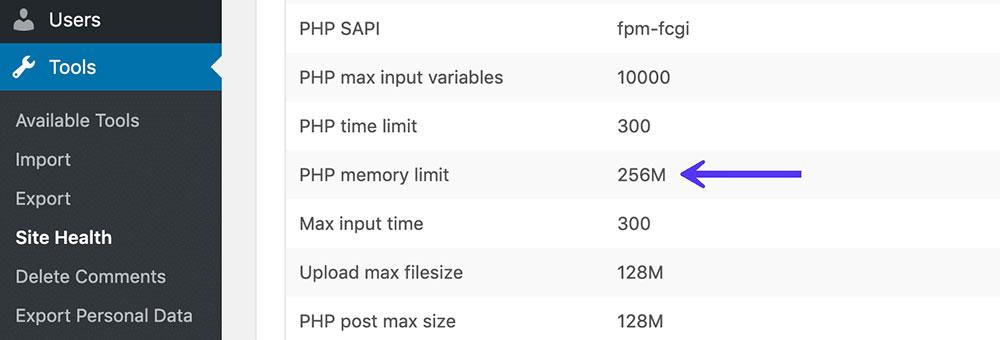
Once you’ve made your changes, save the file and re-upload it if necessary. You can verify if the memory limit has been successfully updated by checking your WordPress dashboard under Tools > Site Health, where it will show the current memory limit settings.
By taking these steps, you’re setting the stage for a smoother, faster WordPress experience that can handle more traffic and resource-intensive processes. Remember, a little adjustment can lead to meaningful improvements in your site’s performance!
Editing php.ini to Supercharge Your WordPress Performance
Editing your php.ini file can have a remarkable impact on your WordPress site’s performance, especially when it comes to memory limits. This file acts as the central configuration hub for PHP on your server, and tweaking it properly can ensure your site runs smoothly and efficiently. Here’s how to do it effectively:
To locate your php.ini file, you may need to access your server via FTP or use a file manager provided by your hosting service. Once you find it, consider making a backup copy first, just in case you need to revert any changes. Here are some key parameters you might want to adjust:
- memory_limit: This sets the maximum amount of memory a script can consume. Increasing this value to
256Mor even512M can significantly enhance performance. - upload_max_filesize: If you’re dealing with large media files, set this value to match your needs. A common setting is
64M. - post_max_size: This should be greater than or equal to
upload_max_filesize, typically set to 64Mas well. - max_execution_time: Increasing this can definitely help with heavy scripts. A value of
300seconds is frequently enough sufficient.
Here’s a quick example of how your php.ini settings might look after adjustment:
| Setting | Value |
|---|---|
| memory_limit | 256M |
| upload_max_filesize | 64M |
| post_max_size | 64M |
| max_execution_time | 300 |
After making your changes, save the file and restart your web server for them to take effect. You can check if the adjustments worked by using a PHP info file or a plugin that displays your current PHP configuration. Remember, proper adjustments not only improve your site’s speed but also enhance user experience, reduce downtime, and can even positively influence your SEO rankings.
Using .htaccess to Increase Memory Limit Effortlessly
One of the simplest ways to boost your WordPress memory limit is through the .htaccess file. This powerful configuration file governs how your server behaves and can easily be manipulated to increase the available memory for your WordPress site. Here’s how you can do it effortlessly.
First,access your website’s root directory using an FTP client or your hosting provider’s file manager. Look for the .htaccess file,which is usually hidden.If you don’t see it, ensure that you have enabled the option to view hidden files. Once you find it, make a backup copy before making any changes, just in case something goes wrong.
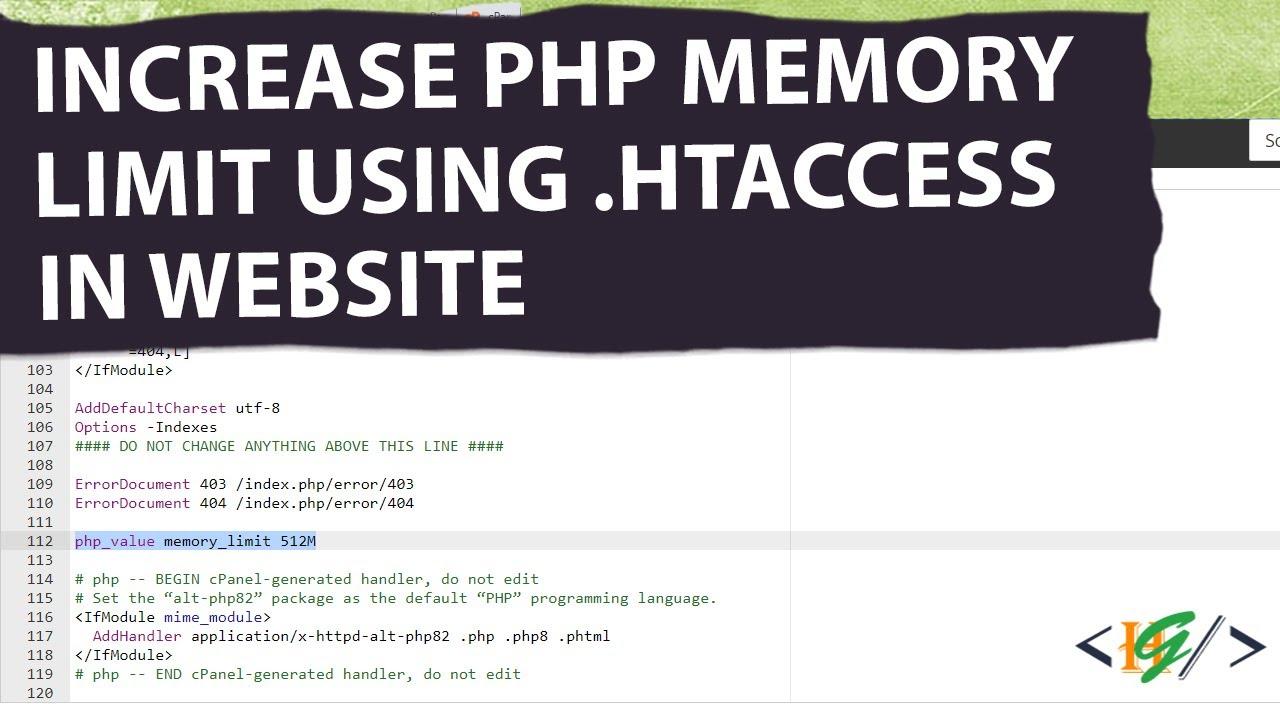
Next, open the .htaccess file in a text editor and add the following line at the end:
php_value memory_limit 256MThis line increases your PHP memory limit to 256 megabytes. You can adjust this value according to your needs, but it’s generally recommended to stay within the range of 128M to 512M for optimal performance.
After you’ve added the line, save the changes and upload the file back to your server. Be sure to clear your WordPress cache and check if the new memory limit has taken effect. You can verify this using a plugin like WP-ServerInfo or by checking your site’s health in the WordPress dashboard.
Keep in mind that this method is straightforward but may not work on all servers, especially shared hosting environments. If you encounter any issues, consider reaching out to your hosting provider for assistance, as they may have restrictions in place that prevent changes through the .htaccess file.

Leveraging Plugin Solutions for Quick Adjustments
When it comes to optimizing your WordPress site, leveraging plugin solutions can be a game changer, especially for quick adjustments like increasing the memory limit. Rather of diving into complex code edits, you can utilize user-friendly plugins that streamline the process.
One of the best options is to use plugins specifically designed for performance enhancements. These plugins not only allow you to adjust memory limits with a few clicks but also offer additional features to improve overall site performance. Here are some popular choices:
- WP Memory Usage – This plugin provides a simple interface to check and modify your memory limit directly from the dashboard.
- W3 Total Cache - Known for its robust caching capabilities, it also enables you to adjust your memory settings in a way that enhances site speed.
- WP-Optimize - This all-in-one optimization plugin helps you clear up bloated databases while allowing memory adjustments.
Setting these plugins up is usually straightforward. After installation, you can navigate to the settings section where you’ll find options to adjust your PHP memory limit. Most plugins provide a slider or input box where you can specify the desired limit, typically between 128M to 512M.
For those who prefer a visual depiction of memory limits,you might find it useful to refer to a comparison table that lists different plugins and their features:
| Plugin Name | Memory limit Adjustment | Performance Features |
|---|---|---|
| WP Memory Usage | Yes | Basic Performance Monitoring |
| W3 Total Cache | Yes | Advanced Caching & Minification |
| WP-optimize | Yes | Database Optimization & Cleanup |
By choosing the right plugin,not only can you adjust the memory limit with ease,but you also enhance your site’s performance without needing extensive technical knowlege.This approach allows even the most novice users to maintain and boost their website’s efficiency effectively.
Contacting Your Hosting Provider for Expert Assistance
When you’ve tried all the usual methods to increase your WordPress memory limit and are still facing issues, reaching out to your hosting provider can be a game changer.These experts not only possess in-depth knowledge of their systems but can also help you troubleshoot any underlying problems that might be affecting your site’s performance.
Before contacting them,it’s helpful to gather some key data:
- Your current memory limit: Check your site’s configuration to see what the current limit is set to.
- Plugins and themes: List any plugins or themes you’ve recently installed or updated that could be memory-intensive.
- Error messages: Document any error messages or performance issues you’ve encountered.
When you’re ready to reach out, consider crafting your message with clarity and detail. A well-structured request will not only save time but also ensure you get the most accurate help:
- Be specific: Clearly state that you’re looking to increase the WordPress memory limit and provide the reasons for your request.
- Ask direct questions: Inquire if they can increase your limit directly or provide guidance on the best practices for achieving this.
- Follow up: If you don’t hear back within a couple of days, a polite follow-up can keep the conversation moving.
| Key Information to Include | Why It’s Significant |
|---|---|
| Your current memory limit | Helps the provider identify the baseline for adjustments. |
| Plugins/Themes in use | Allows them to assess potential memory-heavy components. |
| Error messages | Gives context to the issues you’re facing. |
In many cases, hosting providers are eager to assist because they want to ensure their clients have the best possible experience. By being polite and professional in your communication, you’ll foster a collaborative relationship that can lead to even more insights and optimizations in the future.Don’t hesitate to tap into their expertise; after all, you’re paying for it!

Monitoring Performance After the Memory Increase
once you’ve successfully increased your WordPress memory limit, it’s essential to keep an eye on your site’s performance to ensure everything is running smoothly. Monitoring how your website performs after this adjustment can definitely help you identify any lingering issues or improvements. To do this effectively, consider the following strategies:
- Use Performance Monitoring Tools: Tools like GTmetrix, Pingdom,and Google PageSpeed Insights provide valuable insights into load times and performance metrics. Regularly check these tools to gauge the impact of your memory increase.
- Monitor Server Logs: Keep an eye on your server logs to catch any errors or warning signs that could indicate issues related to memory usage. Look for patterns that might suggest whether your site is benefiting from the increase or if new problems have arisen.
- Check Plugin Performance: Some plugins may not be optimized for high memory limits. After the increase, review the performance of each plugin. Disable any that are causing slowdowns to maintain an efficient site.
Additionally, comparing key performance metrics before and after the memory increase can shed light on the actual benefits. Here’s a simple table to help visualize the changes:
| Metric | Before Memory Increase | After Memory Increase |
|---|---|---|
| Average Load Time | 3.5 seconds | 2.1 seconds |
| Memory Usage | 128 MB | 256 MB |
| PHP Errors | 5/month | 1/month |
Lastly,engage with your users to gather feedback. They can provide insights on any changes they’ve noticed in site performance. This direct feedback is invaluable for understanding real-world effects that numbers alone may not convey.By employing these strategies, you can ensure that the memory increase translates into a smoother, faster, and more robust website experience for your visitors.
Best Practices to Maintain optimal Memory Settings
Optimizing your WordPress memory settings is essential for ensuring your website runs smoothly and efficiently. To maintain optimal performance, consider implementing the following best practices:
- Regularly monitor Memory Usage: Keep an eye on your website’s memory consumption through the WordPress dashboard or by using monitoring plugins. This will help you identify any spikes or issues early on.
- Limit Active Plugins: excessive plugins can drain your memory resources. Evaluate your installed plugins and deactivate or delete those that are unnecessary or redundant.
- Optimize Images and Media: Large images can significantly increase memory usage. Use image optimization tools to compress images before uploading them, ensuring they are web-friendly without sacrificing quality.
- Choose a Reliable Hosting Provider: Select a hosting service that offers ample memory allocation and robust performance.Quality hosting can make a world of difference when it comes to memory management.
In addition to these practices, it’s critically important to stay updated with the latest WordPress versions and security patches. This not only helps in improving memory efficiency but also ensures that any memory-related bugs are resolved promptly.
Another strategy to consider is implementing caching solutions. caching can dramatically reduce the load on your server by storing static versions of your content. This reduces the need for frequent database queries, thereby optimizing memory usage.
| Best practice | Description |
|---|---|
| Monitor memory usage | Use tools to track memory consumption and adjust settings accordingly. |
| Limit Plugins | Deactivate unnecessary plugins to free up memory. |
| Optimize Media | Compress images to reduce file sizes, easing memory load. |
| Use Caching | implement caching tools to reduce server load and memory usage. |
Frequently Asked Questions (FAQ)
Sure! Here’s a conversational Q&A format for your article “How to Increase WordPress Memory Limit: 4 Easy Methods (Expert-Tested for 2025)”.
Q1: Why should I even care about the WordPress memory limit?
A1: Great question! The WordPress memory limit is crucial because it determines how much memory your website can use for processes like loading themes, plugins, and handling user requests. If you hit that limit,your site can become slow,crash,or have issues with plugins. By increasing the memory limit, you ensure your site runs smoothly, which leads to a better user experience and possibly higher search engine rankings!
Q2: Where can I find my current WordPress memory limit?
A2: To check your current memory limit, you can easily do it through your hosting control panel or by installing a simple plugin like “Site Health.” You can also see it by adding a line of code to your theme’s wp-config.php file or using a PHP info file. Knowing your limit is the first step before making any changes!
Q3: What are the methods to increase the WordPress memory limit?
A3: There are four easy methods we’re going to cover:
- Editing the
wp-config.php File: This is often the simplest way. You just need to add a line of code to your configuration file.
- Modifying the
.htaccessFile: If you’re pleasant with a little code, this method can work wonders too.
- Using php.ini File: For those who have access, tweaking this file can help increase the limit.
- contacting Your Hosting Provider: sometimes, you might need your hosting provider to make changes on their end, especially if you’re on a shared hosting plan.
Q4: Can I try these methods myself, or do I need an expert?
A4: You can absolutely try these methods yourself! They’re designed to be straightforward, and we’ll guide you through each step. However,if you’re not comfortable diving into code or accessing files,don’t hesitate to reach out to someone with more experience. It’s always better to be safe than sorry!
Q5: Will increasing the memory limit really make a difference?
A5: Yes, it really can! Many users notice a significant boost in performance after increasing their memory limit. You’ll likely see faster loading times, fewer error messages, and an overall smoother operation of your website. Plus, it can definitely help prevent future issues as your site grows.
Q6: What happens if I still face issues after increasing the memory limit?
A6: If you still encounter issues after boosting your memory limit, it could be due to other factors like plugin conflicts, inadequate hosting resources, or even outdated themes. In such cases, it might be worthwhile to conduct a full site audit or consult with a WordPress expert for more tailored solutions.
Q7: How frequently enough should I check my memory limit?
A7: It’s a good practice to check your memory limit whenever you install new plugins or themes or if you notice performance dips. Regular maintenance will help you stay proactive and ensure your site remains in top shape!
Q8: Ready to get started?
A8: Absolutely! Increasing your WordPress memory limit is a smart move for any website owner. Follow our expert-tested methods, and you’ll be well on your way to a faster, more reliable site. Let’s dive into the how-tos and unleash your site’s potential!
—
Feel free to modify any part of the Q&A to better fit your article’s tone or specific content!
Key Takeaways
And there you have it! Increasing your WordPress memory limit doesn’t have to be a daunting task. With these four easy methods, you can boost your site’s performance and ensure your plugins, themes, and content run smoothly, even as your site grows. Whether you choose to tweak your wp-config.php file,adjust your php.ini settings, or reach out to your hosting provider, you’ve got the tools to make a positive change.
Remember, a well-performing website is not just about speed; it’s also about providing a seamless user experience that keeps your visitors coming back for more. So take these steps today and watch your WordPress site flourish in 2025 and beyond!
If you have any questions or need further assistance, don’t hesitate to reach out. Happy blogging, and may your website reach new heights!