Are you tired of sifting through an endless list of images, videos, and documents in your WordPress media library? If you’ve ever found yourself scrolling for what feels like hours just to locate that one perfect image, you’re not alone! Keeping your media library organized can feel like an uphill battle, especially as your website grows and fills up with content. But what if I told you there’s an easy way to bring some order to the chaos? In this article, we’re diving into the simple yet powerful method of adding media folders to your WordPress site. With just a few steps, you can create a streamlined library that not only saves you time but also enhances your workflow. So, let’s roll up our sleeves and get ready to transform how you manage your media—it’s time to take control and make your WordPress experience smoother and more efficient!
Understanding the Importance of Organizing Your Media Library
Organizing your media library is essential for improving your workflow and enhancing your website’s performance. when your files are neatly categorized, you can save precious time that would otherwise be spent searching for images, videos, or documents. A well-structured library not only boosts efficiency but also positively impacts your site’s SEO. Search engines favor organized content, making it easier for them to index your media and improve your visibility.
Imagine how frustrating it can be to scroll through endless files to find that perfect image. By utilizing folders,you can streamline your search process. Consider organizing your media by categories such as:
- Blog Posts – Group images associated with specific articles.
- Products – Keep product photos organized for eCommerce sites.
- Videos – Separate your video files for easy access.
- Graphics – Store logos, icons, and infographics in one place.
Moreover, a tidy media library enhances collaboration among team members. When multiple users are accessing the same files, having a clear folder structure helps avoid confusion and ensures everyone is on the same page. You can also assign different permission levels to folders, providing a secure surroundings for sensitive files.
Here’s a speedy comparison of the benefits of an organized media library versus a cluttered one:
| Organized Media Library | Cluttered Media Library |
|---|---|
| Quick file retrieval | Time-consuming searches |
| Improved SEO | Poor indexing by search engines |
| Better team collaboration | Increased confusion among users |
| Enhanced professional image | Chaotic brand perception |
organizing your media library isn’t just about aesthetics; it’s a crucial step in maintaining a functional and effective website. By categorizing your files,you’ll not only create a smoother workflow for yourself but also enhance the overall user experience. So, take a moment to invest in your media library—your future self will thank you!
Why Default WordPress Media Management Falls short
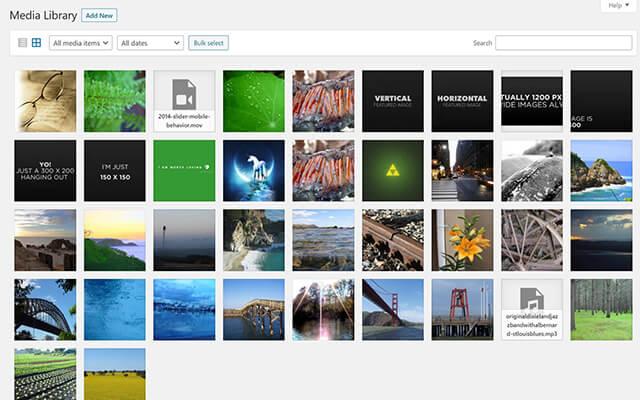
Managing media in WordPress can often feel like trying to find a needle in a haystack. The default media library is functional, but it lacks the organization and efficiency that many users crave. As your site grows and you upload more images, videos, and documents, the single, linear list of files quickly becomes unwieldy. This can lead to frustration, wasted time, and even lost content.
One of the main shortcomings of WordPress’s built-in media management is its lack of folder structures. Without the ability to create folders or categories, files accumulate in a chaotic manner. You might find yourself scrolling through hundreds of images that are poorly labeled or misplaced. This can make it nearly unachievable to locate specific files when you need them most.
Additionally,the default media library does not support batch actions well. say you want to delete, move, or edit multiple files at once; the standard options are limited. This can lead to inefficiencies and a more cumbersome experience when managing your media assets. The inability to perform these actions quickly can turn what should be a simple task into a tedious chore.
Another issue is the lack of metadata sorting. While WordPress allows you to add alt text and descriptions to images, it doesn’t fully leverage this metadata for organizational purposes. Without an easy way to sort or filter by tags, dates, or types, finding the right content can feel like searching for a specific book in a library without a catalog.
It’s clear that the default WordPress media management system has its limitations, which is why many users turn to plugins and external tools for better organization. By implementing a folder structure or using advanced categorization methods, you can transform your media library into a powerful and user-pleasant resource that enhances your workflow and boosts your productivity.
Exploring the Best Plugins for Creating Media Folders
When it comes to managing your media library in WordPress, the right plugins can make a world of difference. By utilizing powerful tools, you can streamline your workflow, making it easier to find, manage, and organize your media files efficiently. Here are some of the top contenders that can transform your media library experience:
- Media Library Organizer: This plugin allows you to create custom folders and categories, so you can group similar files together. With a simple drag-and-drop interface,organizing your images and videos has never been easier.
- Enhanced Media Library: Offering both categorization and tagging features, this plugin provides a robust solution for managing larger libraries. You can easily filter your media items, helping you locate files quickly.
- WP Media Folder: This premium plugin integrates seamlessly with the WordPress media library, letting you create folders to categorize your media. It also supports cloud storage integration, offering versatility for your media management.
To help you decide which plugin might suit your needs best, consider the following comparison:
| Plugin Name | Features | Price |
|---|---|---|
| Media Library Organizer | Custom folders, drag-and-drop | Free |
| Enhanced Media Library | Categorization, tagging, filtering | Free & Paid versions |
| WP Media Folder | Folder creation, cloud integration | $69/year |
Choosing the right plugin can significantly improve your media management capabilities. Take advantage of the free versions to test out the functionalities, and decide which one aligns best with your workflow.Remember, a well-organized media library not only saves you time but also enhances your overall productivity on WordPress.
Ultimately, investing in a quality media management plugin pays off by reducing the frustration that comes with a cluttered media library. Enhance your WordPress experience by exploring these plugins, and discover how simple it can be to keep your media files organized and accessible.
Step-by-Step Guide to Creating Folders in WordPress
Organizing your media library in WordPress can significantly enhance your workflow and make it easier to locate and use your assets. By creating folders, you can categorize images, videos, and documents effectively. Let’s dive into how you can achieve this with a step-by-step approach.
Firstly, you’ll want to ensure you have a reliable plugin installed, as WordPress does not support folders natively. A popular choice is filebird or WP Media Folder. Here’s how to get started:
- Install the Plugin: Navigate to your WordPress admin dashboard, go to Plugins > Add New, search for your chosen plugin, and click Install Now.
- Activate the Plugin: Once installed, click Activate to enable its features.
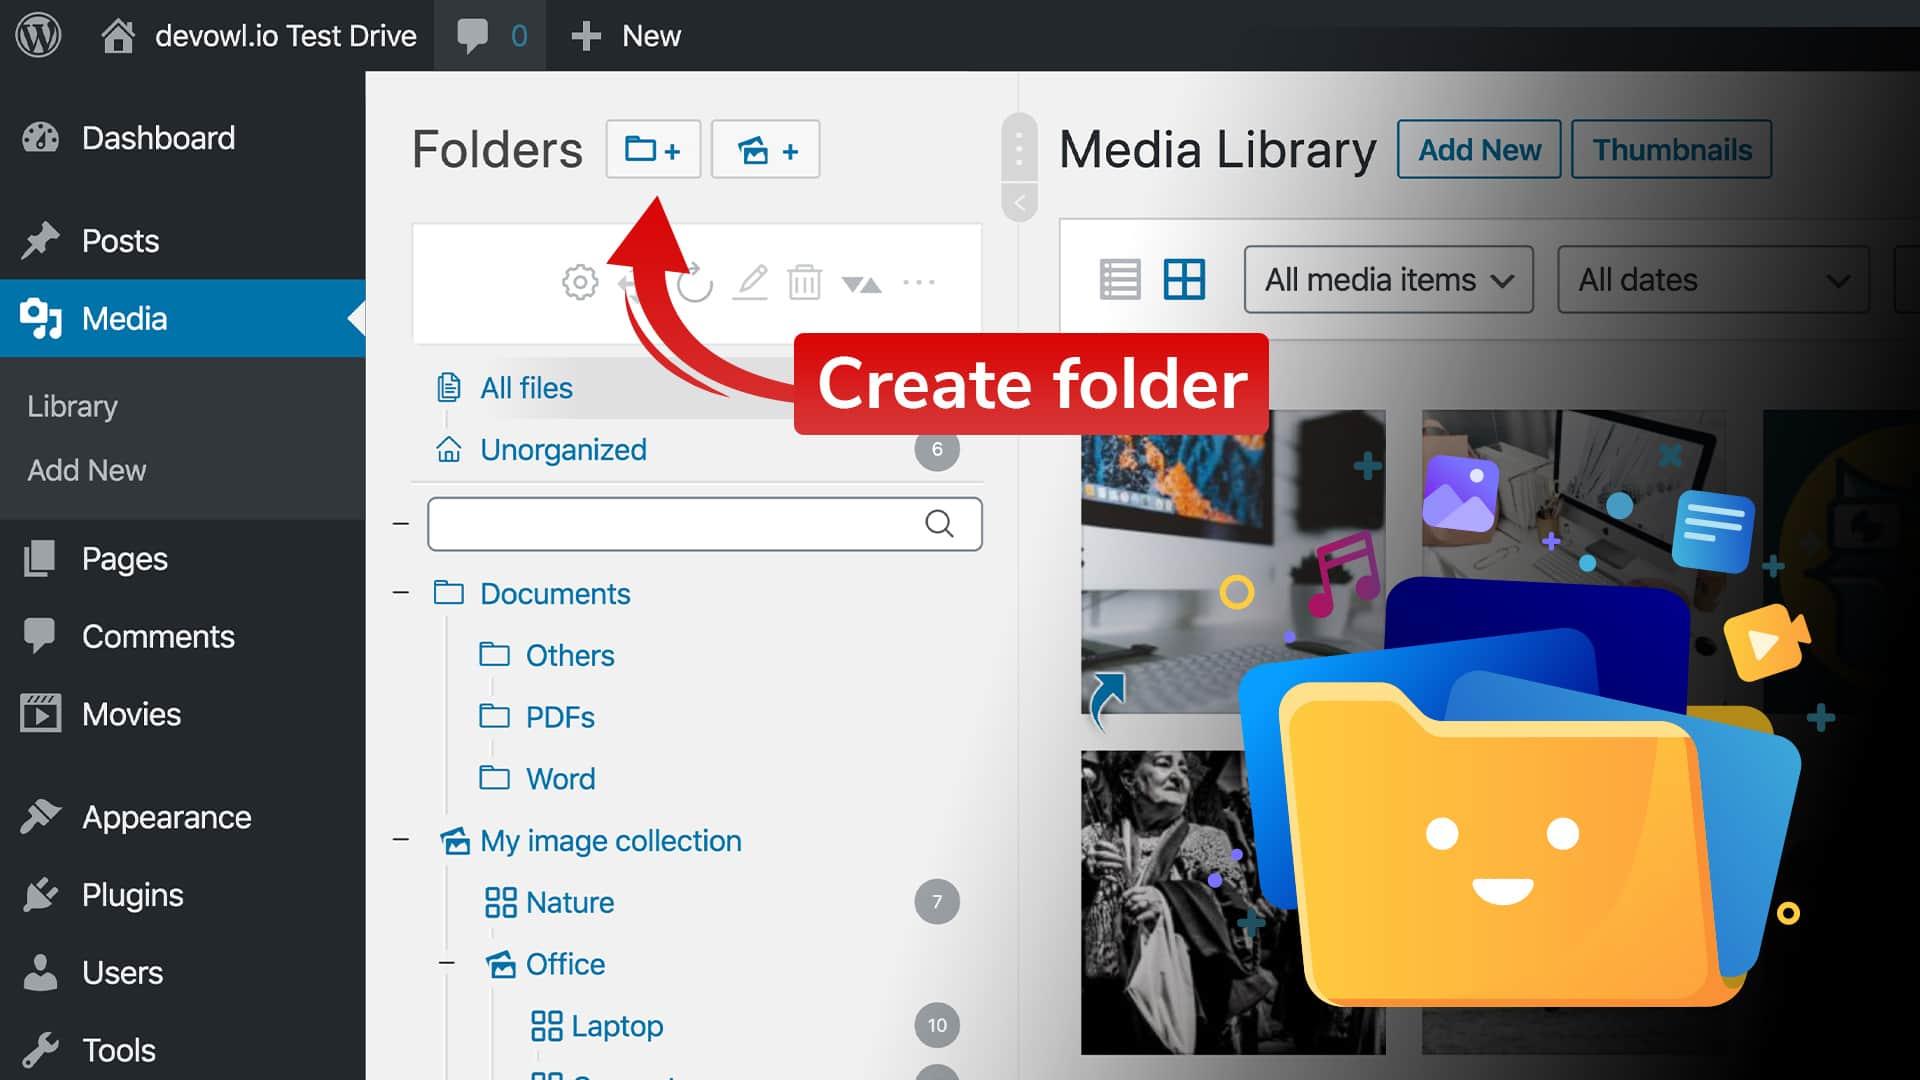
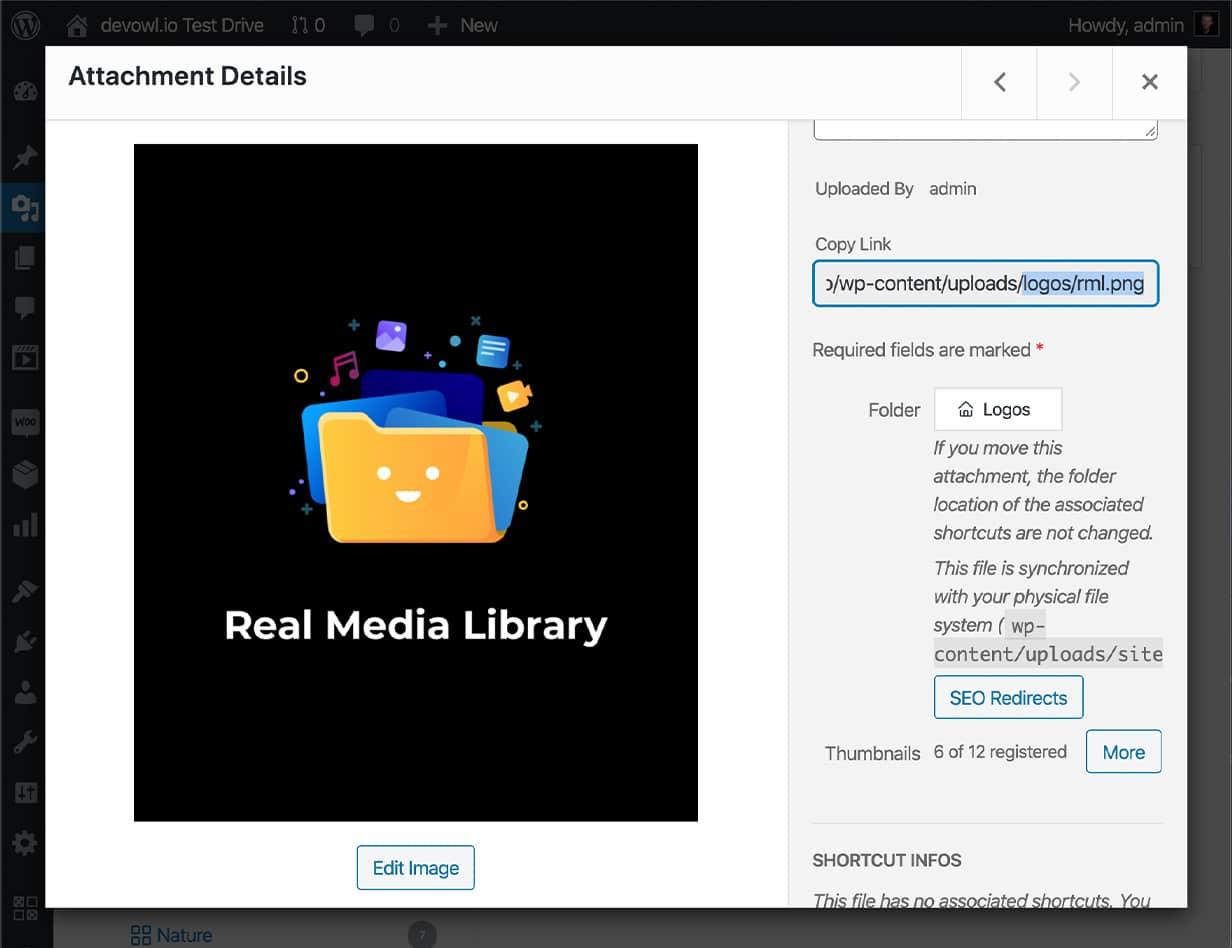
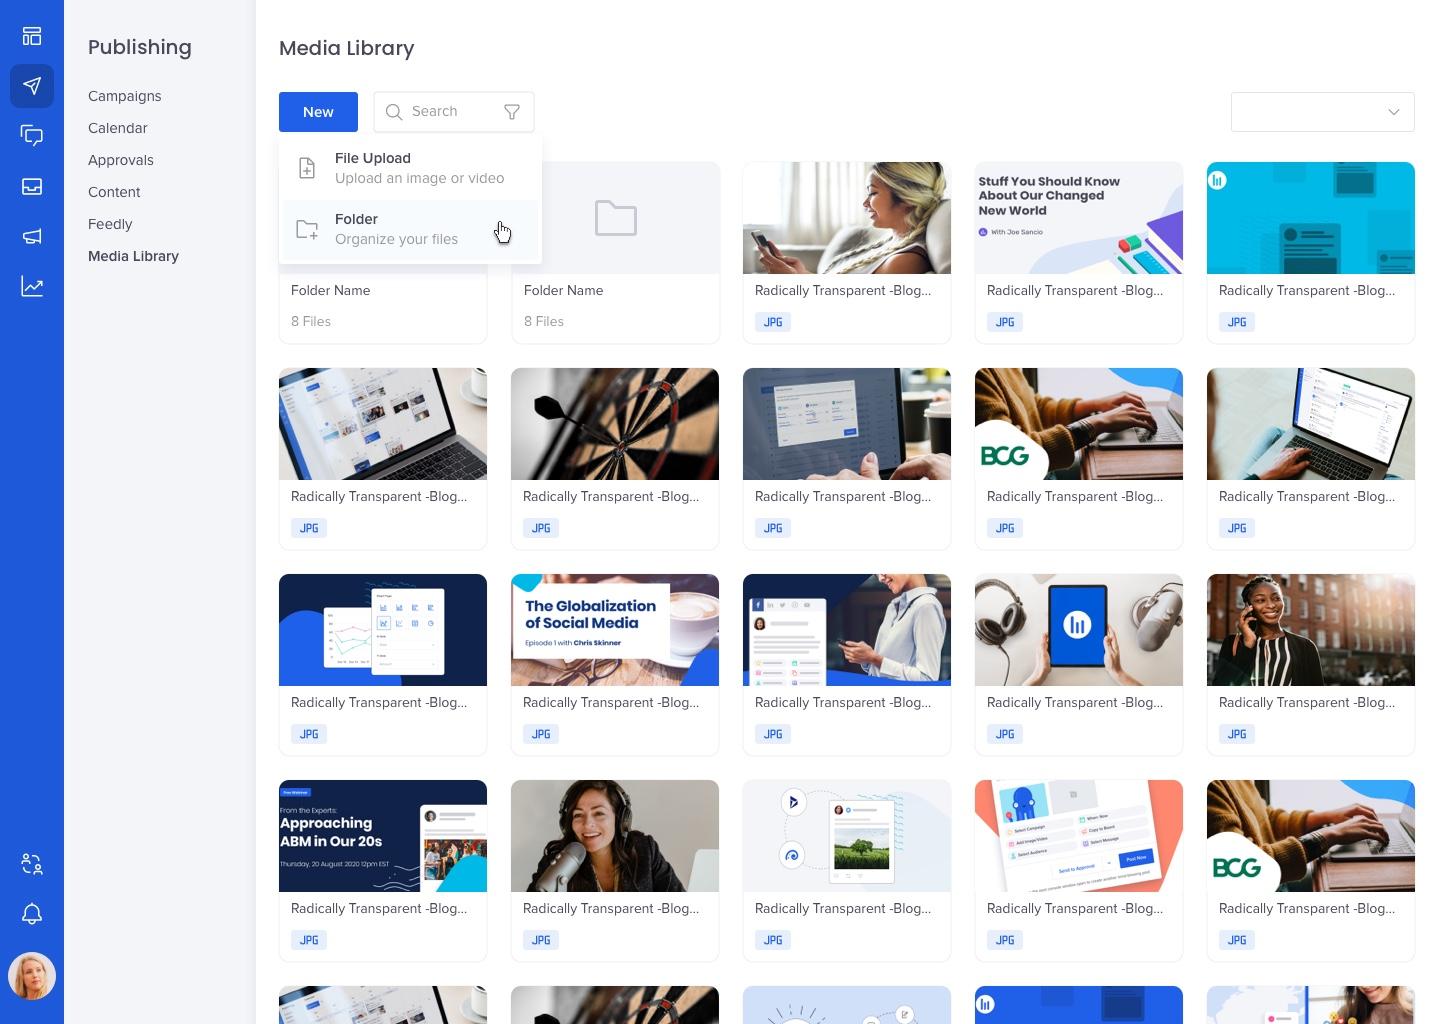
Next, it’s time to create your folders. With the plugin activated, go to your Media Library.You should see a new interface that allows you to add folders:
- Click on the Folder Icon: This will open a new section where you can create folders.
- Name Your Folder: Think about the categories that make the most sense for your content. For example, you could use names like “Blog Posts,” “Product Images,” or “Videos.”
- Create Subfolders: If needed, you can create subfolders within your main folders to further refine your organization.
After setting up your folders, the next step is to start organizing your media files. drag and drop your media items into the appropriate folders. This will help you quickly find files when you need them. Here’s a handy table to visualize the organization:
| Folder Name | Contents |
|---|---|
| Blog Posts | Images related to blog articles |
| product Images | Photos of products for e-commerce |
| Videos | Promotional or tutorial videos |
| Downloads | PDFs or documents for users |
remember to regularly maintain your media folders. Delete any unnecessary files and keep your folders updated. This will not only save storage space but also keep your media library streamlined and efficient. A well-organized media library allows for a smoother content creation process and enhances your site’s overall performance.
Tips for Effectively Naming and Categorizing Your Media
When it comes to organizing your media library, the names and categories you choose can significantly impact your workflow and efficiency. Effective naming conventions make it easier to search for and retrieve your files later on. Consider the following tips for creating a structured naming system:
- Be Descriptive: Use clear and concise terms that describe the content of the media. For example, instead of naming a photo “IMG_001,” opt for “Birthday_Party_2023_Jane_Smith.”
- Use Consistent Formatting: Stick to a consistent naming format. Whether you choose to use underscores, dashes, or CamelCase, ensure that you apply it uniformly across all files.
- Include Dates: For time-sensitive materials, including dates in your file names can definitely help you keep track of when content was created or published. A format like “YYYY-MM-DD” is often most effective.
- Limit Length: While being descriptive is vital, try to keep names relatively short. Long file names can be cumbersome and may not display well in WordPress.
Categorizing your media is just as crucial as naming it effectively.Proper categorization enables quick access to files and allows for better organization. Here are a few strategies to consider:
- Create Broad Categories: Start with a few broad categories that encompass a range of related content. This can help avoid overcrowded folders and make navigation smoother.
- Utilize Subcategories: If you have a lot of media, consider having subcategories for more specific content types. Such as, under “Events,” you could have subcategories like “Weddings,” “Conferences,” and “Birthday Parties.”
- Tagging: Use tags to create additional layers of organization. Tags can be especially useful for cross-referencing content that fits multiple categories.
remember that organizing your media library is an ongoing process. Regularly review your naming and categorization system to ensure it continues to meet your needs.Following these guidelines will not only enhance your current workflow but also pave the way for a more efficient media management process in the future.
![]()
How to Move Existing media into Your New Folders
Once you’ve set up your new media folders in WordPress, you might be wondering how to effectively transfer your existing media files into these organized spaces. The process is quite straightforward, and it will significantly enhance your media management. Here’s how to get started:
- Use a Plugin: The easiest way to move existing media files is through a plugin designed for this purpose. Plugins like FileBird or WP Media Folder offer user-friendly interfaces that allow you to drag and drop files into the appropriate folders with ease.
- Manual Method: For those who prefer a more hands-on approach,you can manually organize your media by downloading the files from your media library and re-uploading them into the desired folders. Although this method is more time-consuming, it allows for a meticulous review of your media files as you sort through them.
- Batch Processing: If you have a large number of media files, consider batch processing. Many media management plugins allow you to select multiple files at once, making it easier to move them into your designated folders without having to handle each file individually.
After deciding on your method, you can streamline the organization process further by using descriptive filenames and tags. This will not only help you find media quickly but also enhance SEO for your images. When re-uploading or reorganizing, take the time to update the file names to something more relevant. Such as, instead of using “IMG_1234.jpg,” rename it to “spring-flower-bloom.jpg.”
Lastly, always double-check that your media files are properly linked within your posts after relocating them. It’s easy to overlook broken links, which can affect user experience and your site’s SEO. You can use tools like Broken Link Checker to help identify any issues after moving your media.
by following these steps, you can effectively transition your existing media into your new folders, making your WordPress media library more organized and efficient. The effort you put into this process will pay off in the ease of managing your media assets in the long run.
Maintaining Your Media Library: Best Practices to Follow
keeping your media library organized is essential for enhancing your workflow and improving efficiency. A cluttered library can make it tough to find the images, videos, or documents you need, leading to wasted time and frustration.By implementing some simple best practices, you can maintain a tidy media library that suits your creative needs.
One effective method to manage your media library is by creating folders for different types of content. Here are some suggested folder categories you might consider:
- Images – Organize by type (e.g., stock photos, personal images, graphics)
- Videos – Separate by project or theme (e.g., tutorials, promotional clips)
- Documents – Keep important files like contracts, proposals, and guides
- Audio – Group music tracks, sound effects, and voiceovers
Utilizing descriptive file names can also significantly enhance your media organization. Instead of generic names like “IMG_1234.jpg,” consider using specific titles like “Summer_Campaign_Meeting.jpg” to immediately convey the content of the file. This approach not only saves time when searching but also helps with SEO when images are used on your site.
Regularly reviewing and cleaning your media library is another crucial practice. Set aside some time every few months to delete unused or outdated media files. This not only declutters your library but also frees up storage space, which is especially important if you are working with a limited hosting plan.
| best Practices | benefits |
|---|---|
| Creating Folders | Improved organization and faster access to files |
| Descriptive File Names | Easier searching and better SEO |
| regular Cleanups | Increased storage space and reduced clutter |
consider using plugins that enhance the media library experience. Many plugins allow for additional functionalities such as bulk image uploads, advanced filtering options, or even automatic folder creation based on criteria you set. Investing in such tools can streamline your workflow and make managing your media library a breeze.
Troubleshooting Common Issues with media Organization
when managing your media library in WordPress, you may encounter several common issues that can hinder your organization efforts. Let’s explore some of these challenges and how to effectively troubleshoot them.
Missing Media Files: One of the most frustrating issues is discovering that certain media files are missing. This can happen due to accidental deletions or migration issues. To address this:
- Check your Trash folder in the Media Library. You can restore files from there if they were deleted recently.
- Use a backup plugin to restore your media files from a previous version of your website.
- Ensure your media uploads folder is correctly set in the WordPress settings.
Slow Loading Times: If you notice that your media library is loading slowly, it can significantly impact your workflow. To speed things up:
- Optimize your images before uploading them using plugins like Smush or EWWW Image Optimizer.
- Consider using a Content Delivery Network (CDN) to distribute the load more efficiently.
- Limit the number of media items displayed per page in your library settings.
Inability to Organize Files: Sometimes, even with folders, organizing your media can feel chaotic. If you find it difficult to categorize your files:
- Utilize descriptive file names and alt tags for easy searching.
- Use custom taxonomies or tags for better categorization.
- Regularly audit your media library to remove outdated or unused files.
Permissions Issues: If you are encountering permission errors when trying to upload media, this might be due to incorrect file permissions on your server. To resolve these issues:
- Check your server’s file permissions. Ideally, directories should be set to 755 and files to 644.
- Consult your hosting provider to ensure your user role has the appropriate capabilities to upload files.
- Disable any conflicting plugins that might restrict media uploads temporarily.
By addressing these common issues proactively, you can create a more efficient and organized media library that enhances your WordPress experience. Remember, a well-structured media library not only saves time but also improves the overall functionality of your website.
Unlocking the Benefits of a Well-Organized media Library
When it comes to managing your website’s content, a well-organized media library is crucial. It not only saves you time but also enhances your efficiency and productivity. With the right structure in place, you can easily locate files, minimize distractions, and streamline your workflows. Imagine being able to find the right image or video in seconds rather than sifting through endless lists of unorganized files!
One of the primary advantages of organizing your media library is improved collaboration. Whether you’re part of a team or simply working with clients, clear categorization allows everyone to access the right resources quickly. Consider using folders to categorize your media based on:
- Project type: Separate files by projects such as blogs, products, or promotional material.
- Media Type: Organize images, videos, and audio files into distinct folders.
- Date: Create folders based on the year or month for better chronological tracking.
Additionally, a tidy media library can significantly enhance your website’s performance. Large media files can slow down your site, impacting user experience and SEO rankings. By maintaining a structured folder system, it becomes easier to manage file sizes and remove duplicates or outdated content. This not only boosts loading speeds but also ensures your visitors have a seamless experience.
Moreover, taking the time to organize your media library can have lasting benefits for your brand’s image. When your media is easy to find and professionally presented, it reflects a level of care and attention to detail that resonates with your audience. This can lead to increased trust and engagement, as users are more likely to interact with a well-maintained site.
To assist you in visualizing the impact of an organized media library, here’s a simple comparison of an organized versus a disorganized library:
| Aspect | Organized Media Library | disorganized Media Library |
|---|---|---|
| Time to Find Resources | seconds | Minutes |
| File Management Tasks | Streamlined | chaotic |
| User Experience | Positive | Frustrating |
| Impact on SEO | Boosted | Negative |
Ultimately, taking a proactive approach in organizing your media library can pay off in numerous ways. By dedicating a little time to set it up properly, you’ll streamline your workflow, prevent potential issues, and create a professional image for your brand that attracts and retains visitors.
Enhancing Your Workflow: How Folders Save You Time and Stress
When it comes to managing your media library in WordPress, organization is key.Folders can be a game changer, allowing you to quickly find and manage your images, videos, and documents without the frustration of endless scrolling. Imagine having your files categorized neatly, just like a well-organized closet. It not only saves you time when searching for specific assets but also reduces the cognitive load, letting you focus on what matters most—creating great content.
Here are some benefits of using folders in your WordPress media library:
- Improved Efficiency: With folders, you can swiftly navigate to the exact category of content you need, whether it’s blog-related images, promotional graphics, or videos.
- Better Collaboration: If you’re working with a team, organized folders ensure everyone knows where to find and upload new files, reducing confusion and overlap.
- Enhanced SEO: When your media is organized, it’s easier to optimize images and videos for search engines, helping your content rank better.
- Reduced Stress: The visual clarity and order that folders provide can significantly decrease stress levels,allowing you to focus your energy on productivity rather than searching.
To add folders to your WordPress media library, consider using a plugin designed specifically for this purpose. Popular options include:
| Plugin Name | Features |
|---|---|
| WP Media Folder | Drag and drop folders, easy integration with page builders. |
| FileBird | Organize media with folders, supports bulk actions. |
| Media Library Assistant | Advanced organizational tools, taxonomy support. |
After you’ve set up folders, take a little time to develop a consistent naming convention. This practice will foster an intuitive structure that anyone accessing the media library can follow. Such as, you could use a format like Year/Project Type/Description to help keep files in order. This way, when you look for a specific image from last year’s marketing campaign, you’ll know exactly where to start.
embracing the folder system in your WordPress media library isn’t just a nice-to-have; it’s an essential strategy for enhancing your workflow. By investing a bit of time into organizing your media, you’re not only streamlining your tasks but also paving the way for more creative freedom and less stress in your content management journey.
Frequently Asked Questions (FAQ)
Q&A: How to Add WordPress Media Folders: Organize Your Media Library Better
Q: Why should I bother organizing my WordPress media library?
A: Great question! An organized media library saves you time and frustration. When you have a well-structured library, finding images, videos, and documents becomes a breeze. Plus, it helps maintain a professional look for your website, ensuring that your content is easily accessible to both you and your visitors.
Q: Can I really create folders for my media in WordPress?
A: Absolutely! By default, WordPress doesn’t let you create folders, but there are user-friendly plugins that make it simple to add this functionality. With just a few clicks, you can start organizing your files into folders like “Images,” “Videos,” or even specific categories for different projects.
Q: What plugins do you recommend for organizing media folders?
A: Two popular options are “Media Library Folders” and “WP Media Folder.” both are user-friendly and offer great features for managing your media. Media Library Folders allows you to create, rename, and delete folders with ease, while WP Media Folder gives you a more advanced interface with drag-and-drop functionality.Q: Is it complex to set up these plugins?
A: Not at all! setting up these plugins is usually as simple as installing them, activating them, and following a quick setup wizard. Most of them come with helpful tutorials and customer support to guide you through the process.
Q: Will adding folders improve the speed of my wordpress site?
A: While organizing your media won’t directly speed up your site, it can improve your workflow and keep things tidy, which can indirectly enhance overall performance. Plus, having everything organized can definitely help you manage your files better, allowing you to easily optimize images for faster loading times.
Q: What if I’m not tech-savvy? Can I still do this?
A: Absolutely! These plugins are designed with user-friendliness in mind. You don’t need to be a tech expert to get started. Most users find the interface intuitive, and there are plenty of guides and resources available to help you along the way.
Q: How can I maintain my organized media library over time?
A: Consistency is key! Make it a habit to upload files to the correct folders right from the start. you can also set aside a little time every month to clean up any unorganized files or outdated media. Regular maintenance will keep everything in order and make your life much easier!
Q: What are the long-term benefits of having an organized media library?
A: The benefits are numerous! You’ll save time searching for files, reduce frustration when managing your content, and improve your website’s overall professionalism. An organized media library also helps with SEO, as you’ll be able to manage alt texts and other media attributes more effectively.
Q: Ready to start organizing? What’s my first step?
A: Let’s get started! The first step is to choose a plugin that fits your needs. Install it,explore its features,and start creating your folders.In no time, you’ll see just how much easier managing your media can be.Happy organizing!
Closing Remarks
And there you have it! Organizing your WordPress media library doesn’t have to be a daunting task. By adding media folders, you can streamline your workflow, find your images and documents quicker, and make your website management a breeze. Imagine how much easier it will be to locate that perfect image for your next blog post or to keep your site looking sharp and professional!
So why wait? Take the steps outlined in this article to transform your media library into a well-organized haven. With just a few simple actions, you’ll save time, reduce stress, and elevate your content game. Remember, a tidy media library not only enhances your productivity but also contributes to a better user experience for your visitors.
Ready to take control of your media? Dive in, get those folders set up, and watch your workflow improve! If you found this guide helpful, don’t hesitate to share it with fellow WordPress users who might be struggling with their media management. Happy organizing!