Are you ready to take your WooCommerce store to the next level? If you’ve ever felt overwhelmed by shipping options or unsure how to calculate costs for different products, you’re not alone. many beginners struggle with this crucial aspect of running an online business. But here’s the good news: mastering shipping classes in WooCommerce can simplify the process adn help you offer a seamless shopping experience for your customers. In this article, we’ll walk you thru everything you need to know about using shipping classes effectively. Whether you’re selling bulky furniture or delicate accessories, understanding how to categorize your products can not only save you time but also maximize your profits. So, let’s dive in and unlock the full potential of your online store!
Understanding Shipping Classes and Their importance in WooCommerce
Shipping classes in WooCommerce are essential tools that allow store owners to categorize and manage shipping rates effectively. By assigning products to different shipping classes, you can create tailored shipping strategies that benefit both your business and your customers. This categorization enables you to define specific rates for various groups of products, making the shipping process more straightforward and efficient.
Why are Shipping Classes Notable? The importance of shipping classes lies in their ability to enhance the shopping experience. Here’s how:
- Cost Efficiency: Different products have different shipping requirements. By using shipping classes, you can ensure that heavier or bulkier items have higher shipping rates, while lighter items benefit from lower costs.
- Improved Customer Satisfaction: Customers appreciate openness. When thay can see clear shipping costs associated with the items they wish to purchase, it builds trust and reduces cart abandonment.
- Versatility: As your business grows, so do your shipping needs. Shipping classes allow you to adapt quickly to changes in inventory, shipping partnerships, or market trends.
To implement shipping classes, you simply need to navigate to the WooCommerce settings, where you can create classes based on your specific needs. Each class can have its own shipping rate, which you can adjust as necessary. Below is a simple table that illustrates an example of how shipping classes can be set up:
| Shipping Class | Description | Shipping Rate |
|---|---|---|
| Standard | For regular items | $5.00 |
| Heavy | For items over 10 lbs | $15.00 |
| Free Shipping | For orders over $50 | Free |
Incorporating shipping classes into your WooCommerce store not only saves you time but also provides clarity for your customers. They can easily understand what they are paying for when they proceed to checkout. Encouraging them to spend a bit more to qualify for free shipping can also lead to increased sales.Thus, leveraging shipping classes effectively can play a significant role in your overall sales strategy.
Getting Started with Shipping Classes: A Step-by-Step Guide
Understanding shipping classes in WooCommerce can significantly improve your online store’s functionality. To get started, navigate to your WordPress dashboard and head over to WooCommerce > Settings > Shipping. From here, you can access the shipping classes section where you can define different classes based on various criteria. This customization enables you to create a tailored shipping experience that meets the needs of your customers.
Next, you’ll wont to define your shipping classes. Click on the Shipping Classes tab and add new shipping classes based on your product categories. As an example, you might have classes for:
| Shipping Class | Description |
|---|---|
| Standard Shipping | Typical items with regular shipping rates. |
| Heavy Items | Bulky products that require higher shipping fees. |
| Express Shipping | Faster delivery for time-sensitive orders. |
After setting up your shipping classes, it’s time to assign them to your products. Simply edit a product and scroll down to the Product data section. Under the Shipping tab, you can select the appropriate shipping class from a dropdown menu.This ensures that each product is charged the correct shipping rate based on its category.
To make the most out of shipping classes, consider using specific shipping zones. Create zones based on geographic locations where you deliver your products. Each zone can have tailored shipping methods and rates that correspond to the classes you’ve created. This setup allows for a more localized approach, ensuring your customers receive fair shipping prices irrespective of where they are located.
lastly, don’t forget to test your setup.Place a few test orders using various products assigned to different shipping classes. This will help you see firsthand how the shipping rates are applied during checkout. Ensuring smooth operation at this stage enhances customer satisfaction and can lead to repeat business.
Setting Up Your Shipping Classes in WooCommerce
When it comes to managing shipping for your eCommerce store, understanding how to effectively set up shipping classes in WooCommerce can make a significant difference. Shipping classes allow you to assign different shipping rates to different groups of products, which can be particularly beneficial when dealing with a variety of product types or weights. Here’s how you can navigate this feature seamlessly.
First, you’ll want to access the shipping settings in your WooCommerce dashboard. Begin by navigating to WooCommerce → Settings → shipping. Here,you will find the option to add a shipping zone if you haven’t done so already. Shipping zones define the geographical areas you’re willing to ship to, and they can have different shipping methods and classes assigned to them. Once your zones are set up, you can create shipping classes by clicking on Shipping Classes under the Shipping settings menu.
Creating a shipping class is straightforward. Simply click on the Add Shipping Class button and fill in the necessary fields:
| field | Description |
|---|---|
| Name | The name of your shipping class (e.g., Heavy, Fragile). |
| Slug | A URL-friendly version of the name. |
| description | A short description of the shipping class. |
Once you’ve created your shipping classes, it’s time to assign them to specific products. Go to Products → All Products, and select the product you want to edit. In the product data section, locate the Shipping tab, and you will find an option to choose your shipping class from a dropdown menu. Repeat this process for each product that requires a specific shipping rate, ensuring that your classes are assigned correctly.
Next, you’ll need to configure your shipping rates for the classes you’ve created. Return to the shipping method settings under the relevant shipping zone and click on the edit button next to the method you’d like to configure (e.g., Flat Rate). Here, you can set specific rates for each shipping class. As a notable example, you might charge $5 for standard items and $15 for heavy items. This method allows for flexibility and can significantly enhance customer satisfaction by providing clear shipping costs based on product type.
Lastly,always remember to test your shipping configuration. Add products from different shipping classes to your cart and proceed through the checkout process to confirm that the correct rates are applied. This simple practice ensures that your customers have a smooth purchasing experience, which is crucial for retaining their business.
How to Assign Products to Shipping Classes Effectively
Assigning products to shipping classes is a crucial step in streamlining your WooCommerce store’s operations. Effective shipping classes can help you manage shipping costs,cater to specific customer needs,and enhance the overall shopping experience. Here’s how to do it in a way that maximizes efficiency and boosts your sales.
First, understand the different shipping classes you can create. Common examples include:
- Standard Shipping: For most products with regular shipping rates.
- Heavy Items: For bulkier goods that incur higher shipping costs.
- Free Shipping: For items that you want to promote with no shipping fees.
- Local Delivery: For products available for area-specific delivery.
Next, when it comes to assigning products to these classes, keep the following tips in mind:
- Evaluate Your Product Range: Ensure that products with similar shipping characteristics are grouped together. This makes it easier to manage and communicate shipping costs.
- Consider Weight and Size: Products that are heavier or larger should have their own class to prevent unexpected shipping charges.
- Use product Tags: tagging products with specific shipping classes can help you quickly identify which products fall into which category.
Once you create your shipping classes, you can easily assign them through the product editor. here’s a straightforward way to do it:
| Step | Action |
|---|---|
| 1 | Navigate to WooCommerce > Settings > Shipping. |
| 2 | Click on Shipping Classes and add or edit classes as needed. |
| 3 | Go to the Products section and select a product to edit. |
| 4 | Under the Product Data section, choose the relevant shipping class. |
| 5 | Update the product to save your changes. |
once your products are assigned to shipping classes, test your checkout process to ensure everything works smoothly. This includes verifying shipping costs and ensuring that customers see the correct shipping options based on their selections. By effectively assigning shipping classes, you’re setting your store up for greater customer satisfaction and efficiency in order fulfillment.
Customizing Shipping Rates for Different Classes
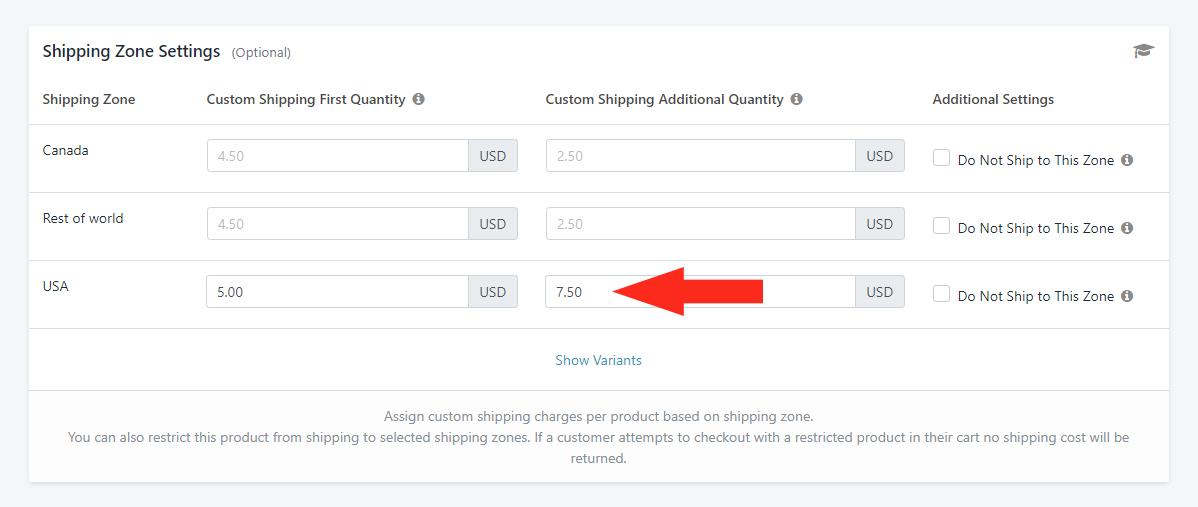
When it comes to managing your online store,one of the most crucial aspects is ensuring that your shipping rates are tailored to meet the needs of your diverse clientele. Different products often have varying shipping requirements based on size, weight, and destination.By utilizing shipping classes in WooCommerce, you can easily customize rates for each class, providing a seamless shopping experience for your customers.
To start,you’ll first need to create shipping classes. Navigate to WooCommerce > Settings > Shipping > Shipping Classes.Here, you can define different classes based on your inventory. For example:
- Standard Products: Regular items that have standard shipping rates.
- Heavy Items: Products that are heavier and may require additional shipping costs.
- Fragile Items: Delicate products that need special handling and shipping.
Once you have your classes set up, assign them to your products. Go to the product edit screen and locate the Product Data section. Under the Shipping tab, you can select the appropriate shipping class for each product. This step is essential, as it dictates how the shipping costs will be calculated at checkout.
After assigning shipping classes, the next step is to set up specific shipping rates. This can be done by navigating to WooCommerce > Settings > shipping Zones. Here you can define different zones based on geographical areas and set rates for each shipping class.As an example, you might create a table like this:
| Shipping Class | Domestic Rate | International Rate |
|---|---|---|
| Standard Products | $5.00 | $15.00 |
| Heavy Items | $10.00 | $25.00 |
| Fragile Items | $8.00 | $20.00 |
By using this approach, customers will see obvious shipping fees based on the products in their cart, which can significantly reduce cart abandonment rates. remember to regularly review and adjust your shipping classes and rates based on customer feedback and shipping cost fluctuations. This proactive management of your shipping strategy ensures that your store remains competitive and customer-friendly.

Best Practices for Managing Shipping Classes
Shipping classes in WooCommerce are essential for organizing your products based on their shipping requirements. To manage them effectively, consider the following best practices:
- Identify Product Categories: Start by categorizing your products based on weight, size, or shipping costs. This will help you define which items belong to specific shipping classes.
- Use Descriptive Names: When creating shipping classes, choose clear and descriptive names. This makes it easier for you and your customers to understand the shipping options available.
- Set Competitive Rates: Research your competitors to ensure your shipping rates remain competitive while covering your costs. Adjust the shipping class rates accordingly.
Once you’ve established your shipping classes, it’s important to regularly review and adjust them.Consider the following tips for maintaining your classes:
- Monitor Performance: Keep track of shipping costs and customer feedback. If a particular shipping class is underperforming, reassess its rates or criteria.
- Stay Updated: Regularly review your shipping classes as your product range evolves. As new products are added, they might require new shipping classes or adjustments to existing ones.
To visualize your shipping classes and their associated rates, consider using a table to outline the details:
| Shipping Class | Criteria | Rate |
|---|---|---|
| Small Items | Weight: Up to 1kg | $5.00 |
| Medium Items | Weight: 1kg – 5kg | $10.00 |
| Large Items | Weight: 5kg – 10kg | $15.00 |
implementing these practices will not only streamline your shipping process but also enhance customer satisfaction. By ensuring your shipping classes are well-managed, you can create a seamless shopping experience that encourages repeat business.

Common Mistakes to Avoid When Using Shipping Classes
When setting up shipping classes in woocommerce, it’s crucial to steer clear of some common pitfalls that coudl undermine your effort. One major mistake is not defining clear shipping classes for different types of products. without distinct classes, you may end up with inconsistent shipping rates, leading to confusion for both you and your customers. Ensure each product type has its own class that accurately reflects its shipping needs.
Another frequent oversight is neglecting to update shipping settings after adding new products. Every time you introduce new items to your store, take the time to evaluate whether they fit into an existing shipping class or if they require a new one. Failing to do so can result in incorrect shipping charges at checkout,which can damage your reputation and lead to lost sales.
Additionally, many users forget to test their shipping setup before going live. It’s essential to simulate different scenarios to see how shipping charges are applied. Use the WooCommerce built-in tools to check if everything functions correctly, as this will help you catch any discrepancies or errors before your customers do.
Don’t overlook the importance of communicating shipping costs clearly to customers. if your shipping classes lead to different rates, ensure that this information is readily available on product pages. Consider adding a shipping information section that outlines what customers can expect. Transparency will foster trust and reduce cart abandonment.
| Common mistakes | Consequences |
|---|---|
| Not defining clear shipping classes | Confusing rates and unhappy customers |
| Neglecting updates with new products | Incorrect shipping charges at checkout |
| Not testing the shipping setup | Errors noticed by customers |
| Poor interaction about shipping costs | Increased cart abandonment |
Lastly, avoid using excessive shipping classes. While it might seem beneficial to have a shipping class for every product variation, too many can add complexity and confusion. Focus on categorizing your products into a manageable number of classes that sufficiently cover your needs without overwhelming you or your customers.

Testing Your shipping Setup: Ensuring a Smooth Customer Experience
Before you launch your WooCommerce store, it’s crucial to test your shipping setup to ensure that your customers enjoy a smooth and hassle-free experience. Shipping can significantly impact customer satisfaction and, ultimately, your bottom line. Therefore, taking the time to run through your shipping classes and settings is paramount.
Start by placing a few test orders using various shipping classes. This will help you identify how each class functions in terms of cost and delivery time. Such as, if you have set up shipping classes for standard, expedited, and free shipping, simulate orders under each category:
- Standard Shipping: Check if the delivery times align with your expectations.
- Expedited Shipping: verify that the pricing reflects urgency.
- Free Shipping: Ensure that it applies correctly and meets your minimum purchase requirements.
Additionally,confirm that your shipping zones are accurately configured. A common mistake is misclassifying regions, which can lead to incorrect shipping rates. Utilize WooCommerce’s built-in shipping zones feature to define specific areas and rates for your products. Here’s a quick overview of how your shipping zones might look:
| Shipping Zone | Regions Included | Shipping Class Used |
|---|---|---|
| Zone 1 | United States | Standard, Expedited |
| Zone 2 | Canada | Standard, Expedited |
| Zone 3 | International | Standard |
Don’t forget to account for different product weights and dimensions, as they can dramatically alter shipping costs. Use the built-in weight and dimensions settings in WooCommerce to ensure accurate calculations. Mistakes in these areas can lead to unexpected charges that frustrate customers and drive them away.
always keep communication open with your customers. Ensure that they receive timely updates about their orders and shipping statuses.This transparency builds trust and enhances the overall shopping experience. By running thorough tests of your shipping setup, you are not only improving the customer journey but also reinforcing your credibility as a reliable seller. Remember,a happy customer is a repeat customer!
Maximizing Your Shipping Strategy with WooCommerce Plugins
When it comes to optimizing your shipping process in WooCommerce, utilizing shipping classes can make a significant difference. Shipping classes are essentially categories that allow you to group products with similar shipping requirements. this feature not only simplifies the management of shipping rates but also enhances the overall customer experience by providing accurate shipping costs and options at checkout.
To get started with shipping classes, navigate to your WooCommerce settings and look for the shipping tab. There, you can create new shipping classes, which can include categories like fragile items, heavy goods, or standard shipping.By categorizing your products, you can set specific shipping rates tailored to each group. For instance,fragile items may require additional handling fees,while heavy goods might have a higher shipping cost due to weight. This targeted approach ensures that your customers are charged fairly based on the products they purchase.
Here’s a simple table to illustrate how you might set up shipping classes:
| Shipping Class | Shipping Fee | Description |
|---|---|---|
| Standard | $5.00 | For regular items with no special requirements. |
| Fragile | $10.00 | For items that need careful handling during shipping. |
| Heavy | $15.00 | For heavier products that require additional shipping costs. |
Once you have set up your shipping classes, it’s essential to assign them to your products. You can do this by editing each product in your WooCommerce dashboard and selecting the appropriate shipping class from the product data section. This step is crucial as it ensures that the correct shipping rates are applied at checkout, improving transparency and customer trust.
Additionally, consider using other WooCommerce plugins that work in tandem with shipping classes to further enhance your shipping strategy. Plugins like Table Rate Shipping allow you to create more complex shipping rules based on conditions such as weight, quantity, or even the destination. By combining these tools, you can craft a shipping strategy that not only meets your business needs but also delights your customers.
Analyzing Shipping Performance: Making Data-Driven Adjustments
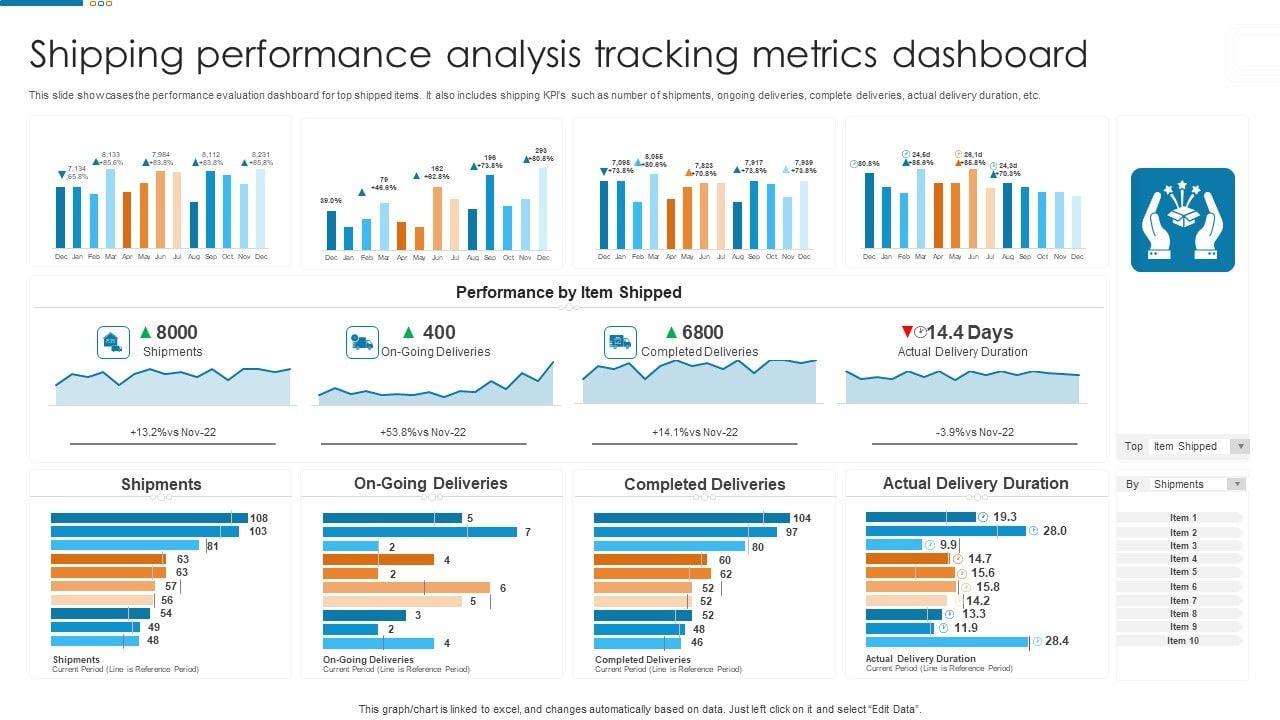
In the world of e-commerce, understanding your shipping performance is key to satisfying customers and optimizing operations. Leveraging data analytics allows you to spot trends and inefficiencies, enabling you to make informed adjustments. Here are several critical metrics to consider:
- Shipping Time: Track how long it takes for orders to reach customers. Long shipping times can lead to dissatisfaction, so consider adjusting your logistics or shipping classes.
- Shipping Costs: Analyze the costs associated with different shipping classes. Are you pricing yourself out of the market, or are you leaving money on the table?
- Order Fulfillment Rates: Monitor how many orders are successfully fulfilled on time. Low rates might indicate issues in your supply chain or warehouse management.
- Customer Feedback: Collect and evaluate customer reviews and satisfaction surveys to understand their shipping experiences.
Once you’ve gathered your data, it’s time to dive deeper. Segment your shipping data by class to see which performs best. You might find that special shipping classes for high-value items yield more satisfaction and lower return rates. here’s a simple way to visualize and compare the performance of your shipping classes:
| Shipping Class | Average Delivery Time | Average Cost | Customer Satisfaction (%) |
|---|---|---|---|
| Standard | 5-7 Days | $5.00 | 78% |
| Express | 2-3 Days | $15.00 | 90% |
| International | 10-14 Days | $25.00 | 85% |
After analyzing this data,consider adjusting your shipping strategy. If express shipping is garnering higher customer satisfaction,you may want to promote it more aggressively or find ways to reduce its costs. conversely, if standard shipping is underperforming, investigate whether you can streamline your logistics or improve communication with customers regarding delivery expectations.
making data-driven adjustments to your shipping strategy can significantly enhance customer satisfaction and ultimately drive sales. By monitoring key performance indicators and understanding the nuances of your shipping classes, you can ensure that your WooCommerce store meets and exceeds customer expectations.
Frequently Asked Questions (FAQ)
Q&A: How to Use Shipping Classes in WooCommerce: For Beginners
Q: What are shipping classes in WooCommerce?
A: Great question! Shipping classes in woocommerce are a way to categorize your products based on their shipping needs. This allows you to set different shipping rates for different types of products. Such as,if you sell heavy items and lightweight items,you can set a higher shipping rate for the heavy ones and a lower rate for the lightweight ones.
Q: Why should I use shipping classes?
A: Using shipping classes can significantly enhance your store’s customer experience. By tailoring shipping rates to specific products, you can ensure that your customers only pay what’s fair for shipping. Plus,it helps you manage shipping costs more effectively,making your business more profitable. If you want to keep your customers happy and encourage repeat purchases, shipping classes are a must!
Q: How do I create shipping classes in WooCommerce?
A: Creating shipping classes is super easy! Just go to your WooCommerce dashboard, click on ‘Settings’, and then navigate to the ‘Shipping’ tab. From there, you’ll see an option for ‘Shipping Classes.’ Click on it, and you can add new shipping classes by filling in the details like name and description.It’s user-friendly, and you can do it in just a few minutes!
Q: Can I assign products to different shipping classes?
A: Absolutely! Once you’ve created your shipping classes, you can assign them to your products individually. Just go to the product editing page, find the ‘Shipping’ section, and select the appropriate shipping class from the dropdown menu.It’s a simple step that makes a big difference in how your shipping costs are calculated!
Q: How do I set shipping rates for different classes?
A: To set shipping rates for your classes, head back to the ‘Shipping’ tab in your WooCommerce settings and click on the shipping method you want to configure (like flat rate). you’ll see options to set rates per shipping class. This way, you can customize the shipping costs based on the specific needs of each shipping class you created. It’s all about giving your customers fair and transparent shipping costs!
Q: Is it possible to have free shipping for certain classes?
A: Yes, you can absolutely offer free shipping for specific shipping classes! If you want to incentivize customers to buy certain products, this is a great strategy. Simply set the shipping class you want to offer free shipping for, and then adjust the settings in the shipping method you’re using. Your customers will appreciate the perk, and it might just boost your sales!
Q: Do shipping classes affect international shipping?
A: They can! If you’re selling internationally, you can set different shipping rates for different classes not only for domestic shipping but also for international. This means you can ensure that the shipping fees are aligned with the specific shipping requirements of each class, which is crucial for maintaining a profitable international business.
Q: What if I need to make changes later?
A: No worries! WooCommerce makes it incredibly easy to make changes to your shipping classes and rates at any time. Just revisit the shipping classes or shipping methods settings in your dashboard, and you can update anything you need. Flexibility is key in eCommerce, and WooCommerce gives you that.Q: Is there anything else I should know about shipping classes?
A: Definitely! One critically important thing to remember is that clear communication with your customers is vital. make sure your shipping policies, including your shipping classes and rates, are easy to find on your website.The more transparent you are, the more trust you build with your customers, which can lead to higher conversion rates!
Q: Where can I get more help if I need it?
A: If you find yourself needing more assistance, the WooCommerce documentation is a fantastic resource. They have detailed guides and FAQs that can help you troubleshoot any issues. Plus, there are plenty of online communities and forums where you can connect with other WooCommerce users to share tips and tricks.
So, ready to dive into the world of shipping classes? Implementing them can be a game-changer for your online store, making it not only more efficient but also a lot more appealing to your customers. Happy selling!
Insights and Conclusions
Wrapping It Up
And there you have it! Using shipping classes in woocommerce may seem a bit daunting at first, but once you get the hang of it, you’ll see just how powerful this tool can be for your online store. By categorizing your products based on their shipping needs, you not only streamline your operations but also enhance your customers’ shopping experience.
Imagine your customers finding exactly what they need without any confusion or unexpected costs at checkout. That’s the kind of seamless experience that keeps them coming back for more! Plus, having precise shipping options means you’re more likely to convert those browsers into buyers.
So, why wait? Dive in and start setting up your shipping classes today. Experiment, make adjustments, and watch as your store transforms into a well-oiled shipping machine. If you have any questions or tips you’d like to share from your own experience, feel free to drop them in the comments below. Happy selling!

