Are you looking to dip your toes into the world of web development, but unsure where to start? Well, you’re in luck! Installing WordPress locally on your computer using XAMPP is not only a fantastic way to learn, but it also gives you the freedom to experiment without the pressure of going live. Imagine having your very own playground for creating and testing websites, all from the comfort of your home!
In this beginner’s guide, we’ll walk you through the straightforward process of setting up wordpress on XAMPP, step by step. Whether you want to create a blog, showcase your portfolio, or build a small business website, this method allows you to master the fundamentals of WordPress without any need for an internet connection. Ready to unlock your potential? Let’s get started on this exciting journey!
Understanding the benefits of Installing WordPress Locally
Installing WordPress locally offers a multitude of advantages, especially for beginners eager to dive into web development.First and foremost, it allows you to create and test your website in a safe environment, free from the pressures of public scrutiny. You can experiment with themes, plugins, and custom code without the fear of breaking a live site.
Another key benefit is the speed and efficiency of local development. Since everything runs on your own machine, you can avoid the delays associated with internet connections. This means faster loading times, quicker testing, and an overall smoother workflow. You can edit files, refresh your browser, and see changes happen in real-time, which is incredibly beneficial for learning.
Moreover, working locally is more cost-effective. You won’t need to pay for hosting or domain registration while you’re building and perfecting your site. This is especially advantageous for beginners who are just starting to explore their options. You can invest that saved money into premium themes or plugins later on when your ready to launch.
local installations offer a robust platform for learning and troubleshooting.You can practice resolving issues that may arise, helping you build confidence in your skills. Plus, it’s an excellent way to familiarize yourself with WordPress’s architecture.The more you tinker and play around, the better you’ll understand how to manage a live site effectively.
| Benefits | Description |
|---|---|
| Safe Environment | Experiment without risking a live site. |
| Speed | Faster loading and testing times. |
| Cost-Effective | No hosting fees while developing. |
| Learning Platform | Gain confidence and skills in WordPress. |
Getting Started with XAMPP: Your Local Server Solution
To set the stage for your new WordPress site, you first need to ensure that XAMPP is installed correctly on your computer. This user-kind tool provides an easy way to create a local server environment that mimics the functionalities of a live server. Once installed, you can conveniently manage your database and WordPress files without the complications often associated with remote hosting.
After installing XAMPP, launch the submission and start the Apache and mysql modules. This is crucial, as they are the backbone of your local server. Without these services running,WordPress won’t be able to function properly. Now, let’s move on to downloading WordPress:
- Visit the WordPress.org website.
- Download the latest version of wordpress in a .zip format.
- Extract the .zip file and move the extracted folder to the htdocs directory within your XAMPP installation folder (usually found in C:xampphtdocs).
Next, you’ll need to create a new database for your WordPress site. Open your web browser and navigate to http://localhost/phpmyadmin. Here’s what you’ll do:
- Select the Databases tab at the top of the page.
- Enter a name for your new database (for example, wordpress_db).
- Click on the Create button to finish.
Now, it’s time to install WordPress! Navigate to http://localhost/your-folder-name (replace your-folder-name with the folder name where you placed WordPress). The installation wizard will guide you through the process. Make sure to have the following data handy:
| Field | Value |
|---|---|
| Database Name | wordpress_db |
| Username | root |
| Password | (leave blank) |
| Database Host | localhost |
| Table Prefix | wp_ |
Once you’ve entered the information, click Submit and follow the remaining prompts to complete the installation. After this, you can log in to your new local WordPress site by navigating to http://localhost/your-folder-name/wp-admin and using the credentials you set during the installation process. With these steps, you’re now equipped to explore the powerful features of WordPress right from the comfort of your local machine!
Step-by-Step Guide to Downloading and Installing XAMPP
Getting started with XAMPP is a breeze, and it opens the door to developing WordPress locally on your machine. Follow these simple steps to download and install XAMPP effectively:
- Visit the Official Website: Go to the XAMPP official site to ensure you’re downloading the latest version of the software.
- Select Your OS: Choose the version that matches your operating system: Windows, macOS, or Linux. Click on the corresponding download button.
- Download the Installer: Once you click the download button, your file will begin downloading. This may take a few minutes depending on your internet speed.
- Run the Installer: Locate the downloaded file and double-click to execute it. If prompted by your system, allow the app to make changes.
- Follow the Setup Wizard: The XAMPP Setup Wizard will guide you through the installation process. It’s best to keep the default components selected, including apache and MySQL.
- Choose Installation Directory: Select the folder where you want to install XAMPP. The default location is usually fine, but choose another path if you prefer.
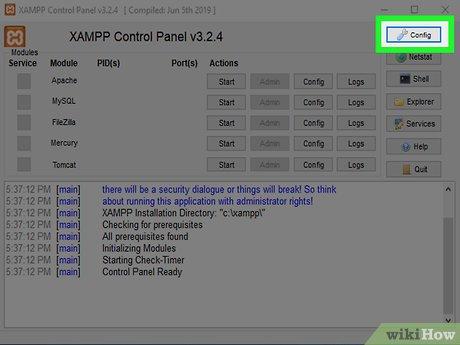
- Complete Installation: Once the installation is complete, you can choose to start the XAMPP Control panel immediately.
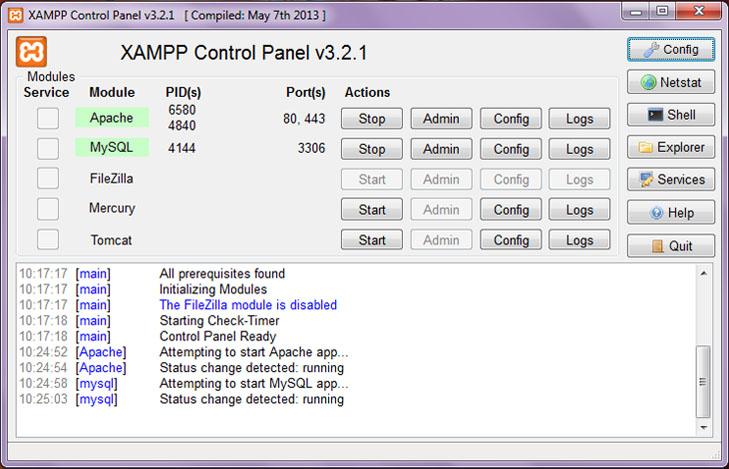
After installation, launching the XAMPP Control Panel will provide you with an easy way to manage your local server. you can start the Apache and MySQL modules with just a click. Make sure both services are running, as these are essential for hosting your WordPress site locally.
If you’re new to using XAMPP, don’t worry! The user interface is straightforward. A fast glance will show you the status of each service, and you can access logs and configuration settings easily. This user-friendliness makes it an ideal choice for beginners who want to dive into WordPress development without the complexities of a remote server.
In case you encounter any issues during the installation, check the FAQ section on the XAMPP website or search for troubleshooting guides on forums. The community around XAMPP is robust, and you’re likely to find solutions to common problems quickly.
| Component | Description |
|---|---|
| Apache | The web server that handles your requests. |
| MySQL | The database management system to store your WordPress data. |
| PHP | The scripting language used to build WordPress. |
| PHPMyAdmin | A web interface to manage your MySQL databases. |
Now that you have XAMPP installed, you’re all set to start your WordPress installation. With this local environment, you can experiment freely without the fear of breaking a live site. Enjoy building your WordPress project locally!
Setting Up Your Database: Creating Your WordPress Environment
To set up a robust WordPress environment on your local machine, the first step is to create a database using XAMPP’s phpMyAdmin. this is where all of your WordPress data will be stored, and it’s crucial for the smooth operation of your site. Let’s dive into the process!
Begin by launching XAMPP and starting the Apache and MySQL modules. Once both services are running, open your web browser and navigate to http://localhost/phpmyadmin. This will take you to the phpMyAdmin interface, where you can manage your databases with ease.
Next, it’s time to create your new database:
- Click on the Databases tab at the top of the phpMyAdmin page.
- In the Create database field, enter a name for your database. A common convention is to use wordpress_db,but you can choose any name that makes sense for your project.
- Select utf8_general_ci as the collation for better support of various characters.
- Click the Create button.
Once your database is created,you’ll see it listed in the left sidebar. This is the core of your WordPress environment.To take a look at it, click on your newly created database name. You won’t see any tables yet, but that’s okay; WordPress will create them during installation.
Now, it’s an excellent idea to set up a user for your database. This adds a layer of security:
| User Name | Password | Privileges |
|---|---|---|
| wp_user | yourpassword | ALL PRIVILEGES |
In phpMyAdmin, go to the User accounts tab, and click on Add user account. Fill in the username (like wp_user) and a secure password. Ensure that you grant ALL PRIVILEGES to this user for the database you just created. this step will ensure that WordPress has the necessary permissions to interact with your database smoothly.
With your database and user set up, you’re now ready to move on to downloading and configuring WordPress itself! This setup will provide you with a solid foundation for your local WordPress installation.
Downloading WordPress: Where to Find the Latest Version
When diving into the world of WordPress, the first step is ensuring you have the latest version ready for your local installation. You can always trust the official WordPress website to provide the most up-to-date and secure version. Here’s how to navigate this process smoothly:
To download WordPress, follow these straightforward steps:
- Visit the official WordPress download page.
- Click on the Download WordPress button, which will automatically direct you to the latest version available.
- Once downloaded, locate the.zip file in your downloads folder.
After downloading the file, it’s essential to extract its contents. This will provide you with a folder containing all the necessary files needed for your local installation. You can do this by right-clicking on the .zip file and selecting the extract option. Within the extracted folder, you’ll find several crucial files and folders:
- wp-admin: The backend of your WordPress site where you manage your content.
- wp-content: Your themes, plugins, and uploaded media will reside here.
- wp-includes: Contains the core functionality of WordPress.
Once you have extracted the files, you’ll need to move the folder to the appropriate directory in your XAMPP installation, typically found in C:xampphtdocs. You can rename the folder to something memorable, like “mywordpresssite,” to make it easier to access later. After this step, you’ll be ready to start configuring your local WordPress environment.
By ensuring you have the latest version downloaded directly from the official source, you’re on the right track to building a secure and efficient WordPress site. Don’t forget to check back regularly for updates, as WordPress frequently releases new versions to enhance performance and security.
Configuring XAMPP for WordPress: essential Settings You Need
configuring XAMPP for your WordPress installation is a critical step that ensures your local environment mirrors a live server. This allows you to develop and test your site efficiently. Here are some essential settings you need to tweak for a seamless experience:
- Port Configuration: By default,XAMPP uses port 80 for Apache. If you have other services running on this port, you might want to change it to 8080.You can do this by editing the
httpd.conffile located in theapache/confdirectory. - MySQL Settings: Ensure that MySQL is running by checking the XAMPP control panel. Set a root password for extra security, especially if you plan on working with sensitive data.
- PHP Configuration: Modify the
php.inifile to suit your needs. Increase thememory_limitto support larger plugins and themes, and adjust theupload_max_filesizeto allow for bigger media files. - Enabling Mod Rewrite: To use pretty permalinks in WordPress, enable the
mod_rewritemodule.This can be done in thehttpd.conffile as well, ensuring that your links are both SEO-friendly and user-friendly.
After configuring these settings, it’s crucial to verify that everything is running smoothly. You can check this by accessing the local URL (e.g., http://localhost/wordpress or http://localhost:8080/wordpress) and looking for the WordPress installation screen. If you face any issues, revisit your configuration files and settings.
For a clearer overview of your XAMPP settings, consider using a table layout to organize key configurations:
| Setting | Default Value | Recommended Change |
|---|---|---|
| Apache Port | 80 | 8080 |
| MySQL Root Password | No Password | Set a Strong Password |
| Memory Limit | 128M | 256M |
| upload Max Filesize | 2M | 64M |
With these settings in place, your XAMPP environment should be ready for a robust WordPress development experience. Remember, each project may require different settings, so feel free to experiment for optimal performance!
Installing WordPress: A Simple Walkthrough for Beginners
To get started with installing WordPress on XAMPP, you’ll first need to set up your local server environment. This involves downloading and installing XAMPP, which provides the necessary PHP and MySQL components for running WordPress.
Step 1: Download XAMPP
Visit the XAMPP website and download the version compatible with your operating system. Once downloaded, run the installer and follow the prompts to complete the installation.
Step 2: Launch XAMPP
After installation, open the XAMPP Control Panel. Start the following modules:
- Apache – This serves your web pages.
- MySQL – This manages your databases.
Ensure both modules are running; they should have green indicators in the control panel.
Step 3: Download WordPress
Visit the wordpress download page and grab the latest version. Extract the downloaded zip file into the htdocs folder in your XAMPP installation directory (usually C:xampphtdocs).
Step 4: Create a Database for WordPress
Open your web browser and navigate to http://localhost/phpmyadmin. This will take you to the database management interface. Here are the steps:
- Click on the Databases tab.
- Enter a name for your database (e.g., wordpress_db). Select utf8_general_ci as the collation.
- Click Create.
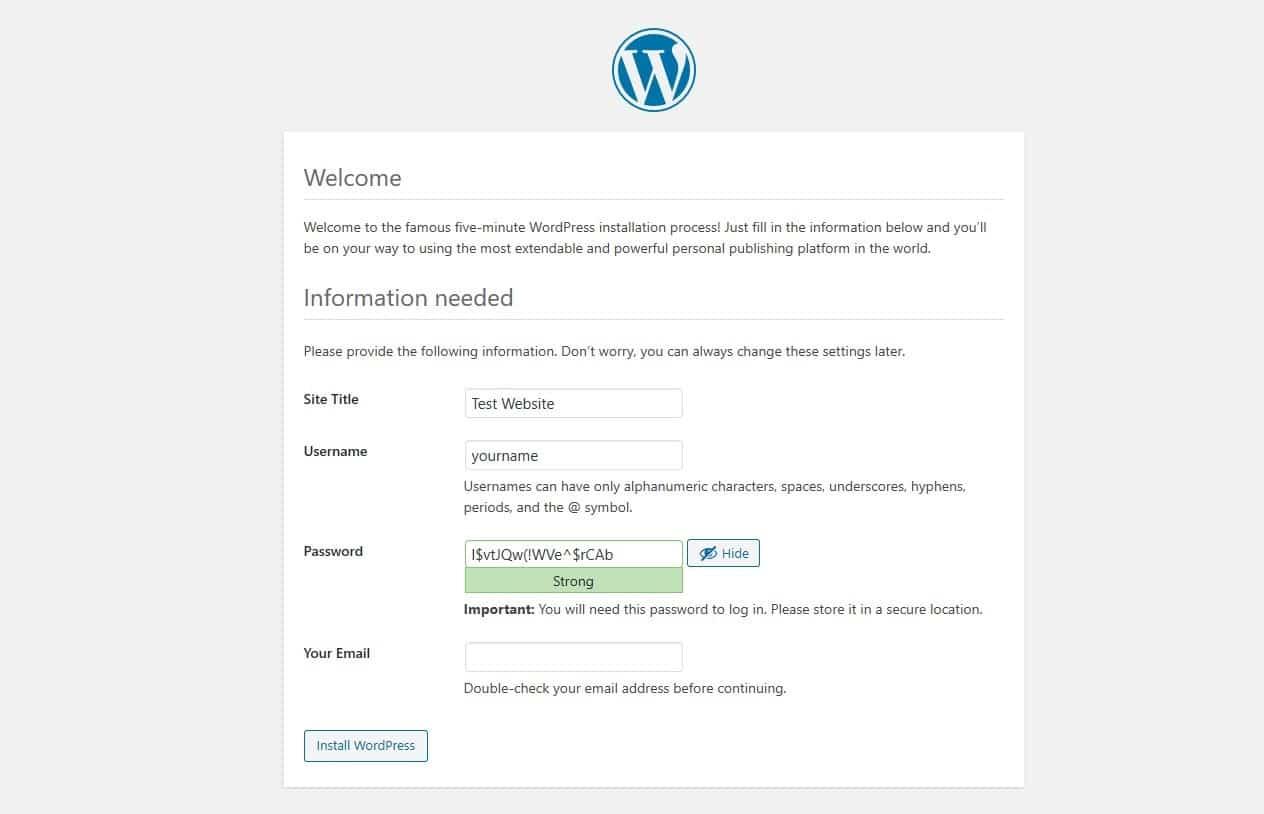
Step 5: Configure WordPress
Now, navigate to http://localhost/wordpress (or the name of the folder you created). Follow the installation wizard:
| Step | Action |
|---|---|
| 1 | Select language. |
| 2 | Enter your database details: |
| 3 | Run the installation. |
Fill in your database name, username (default is root), and leave the password blank. Click Submit and proceed to provide your site title and admin credentials.
Step 6: Complete the installation
Once you finish the setup, log in using the credentials you created. Congratulations! You now have WordPress installed locally on XAMPP. From here, you can explore themes, plugins, and start building your website with confidence.
Troubleshooting Common Issues During Installation
As you embark on your journey to set up WordPress locally using XAMPP, you might encounter a few bumps along the way. Don’t worry; these issues are common and frequently enough easy to resolve. Here are some troubleshooting tips that can definitely help you get back on track.
Database Connection Errors
If you receive an error message stating that a database connection could not be established, check the following:
- Ensure that MySQL is running in your XAMPP control panel.
- Verify that your database name, username (default is root), and password (leave it blank if not set) are correctly entered in wp-config.php.
- Make sure you have created the database in phpMyAdmin before running the installation.
Blank Screen or White Screen of Death
This is a common issue that can occur for various reasons. to troubleshoot:
- Check for errors in the wp-config.php file, particularly any syntax errors that may arise from copy-pasting.
- Increase the memory limit in your php.ini file by searching for the line
memory_limitand increasing the value (e.g.,memory_limit = 256M). - Enable debugging in WordPress by setting
define('WP_DEBUG', true);in your wp-config.php file to display error messages.
Issues with Permalinks
if you find that your permalinks are not working correctly after installation, try the following:
- Go to Settings > Permalinks in your WordPress dashboard and re-save your permalink settings.
- Ensure that the .htaccess file is writable. You may need to create or modify this file in your WordPress root directory.
- Check your Apache configuration to ensure that the mod_rewrite module is enabled.
| Error | Solution |
|---|---|
| Database connection error | Check MySQL status and wp-config settings |
| White screen of death | Debug settings and memory limit |
| Permalink issues | Re-save settings and check .htaccess |
By keeping these common issues and solutions in mind, you’ll be better equipped to handle any challenges that arise while installing WordPress locally. remember, persistence is key, and soon you’ll have a fully functional WordPress site to explore and develop!

Exploring Your Local WordPress Site: Tips for Navigating
Once you’ve successfully set up WordPress on XAMPP, it’s time to explore the powerful features your local site has to offer. Navigating your WordPress dashboard is essential to make the most out of your local development environment. Start by logging in to your WordPress admin panel, typically found at http://localhost/yourfoldername/wp-admin. This is your command center for creating, editing, and managing your site.
Familiarize yourself with the core sections of the dashboard:
- Posts: This is where you can create and manage all your blog entries. Don’t hesitate to experiment with different post formats.
- Pages: Use this area for static content like an About or Contact page. Think of it as the backbone of your site.
- Media: upload images, videos, and other files here. Visual content enhances your posts, so don’t hold back!
- Appearance: Customize your site’s look by selecting themes and adjusting layouts. This section is crucial for establishing your brand.
- Plugins: Expand functionality by adding plugins. From SEO tools to social media integrations, this is where the magic happens.
As you start building your pages and posts, utilize the Block editor to add various content types easily. With blocks,you can seamlessly integrate images,galleries,and even buttons. Drag and drop to rearrange elements until you achieve the desired layout. Don’t forget to check how your changes appear in the preview before going live!
To enhance your learning experience, consider creating a short table of your favorite plugins. This will help you keep track of what you want to implement in your site. Here’s a simple example:
| Plugin | Purpose |
|---|---|
| Yoast SEO | Improve SEO optimization |
| Elementor | Drag-and-drop page builder |
| WooCommerce | Turn your site into an online store |
As you navigate your local site, don’t be afraid to explore various themes and settings. Testing different configurations can provide insight into what works best for your specific needs and preferences. Remember, the beauty of a local installation is the freedom to experiment without the risk of impacting a live site. Enjoy the process, and let your creativity shine!
Unlocking the Power of Local Development: Why It Matters for Beginners
Local development is a game-changer for beginners diving into the world of WordPress. Setting up a local environment allows you to experiment, learn, and create without the pressures of live websites. You can make mistakes, test plugins, and try out themes without fear of breaking anything that the world can see. This hands-on experience is invaluable as it builds your confidence and skill level.
When you install WordPress on XAMPP, you gain access to a myriad of benefits:
- Cost-Effective: No need for a web hosting service while you’re learning.
- Safe Environment: You can play around with configurations and settings without risking your live site.
- Faster Development: Test changes and updates quickly without waiting for a server response.
- Offline Accessibility: Work on your site anytime, anywhere—no internet connection required.
Moreover, local development helps you grasp the core concepts of how WordPress works. You’ll learn about:
- Database Management: Understand how WordPress stores content and settings.
- File Structures: Gain familiarity with WordPress files and directories.
- Theming: Experiment with theme customization without affecting a live site.
- Plugin Testing: Safely try out plugins to see how they enhance your site.
Setting up a local environment is straightforward and involves just a few steps. Here’s a simple breakdown:
| Step | Description |
|---|---|
| 1 | download and install XAMPP. |
| 2 | Start the Apache and MySQL modules. |
| 3 | Download the latest WordPress package. |
| 4 | Extract WordPress files to the XAMPP htdocs folder. |
| 5 | Set up a database using phpMyAdmin. |
| 6 | Run the WordPress installation script via your browser. |
By embracing local development, you’re setting a solid foundation for your WordPress journey. It not only empowers you to learn at your own pace but also opens up a world of possibilities for your future projects. So, take the plunge and unlock the full potential of WordPress right from your own computer!
Frequently Asked Questions (FAQ)
Q&A: How to Install WordPress on XAMPP Locally – Beginner’s Guide
Q1: Why would I want to install WordPress on XAMPP?
A1: Great question! Installing WordPress on XAMPP allows you to create a local development environment on your computer. This means you can build and test your websites without needing an internet connection or worrying about live server issues. It’s perfect for beginners who want to practice, experiment, or simply learn how WordPress works without the pressure of going live.
Q2: What is XAMPP, and why do I need it?
A2: XAMPP is a free and open-source cross-platform web server solution stack package developed to make it easy to install Apache, MySQL, and PHP. In simpler terms, it provides all the necessary tools to run WordPress locally. Think of it as a mini-server on your computer that mimics how websites operate online.
Q3: How do I get started with XAMPP?
A3: Starting with XAMPP is super simple! First, download XAMPP from the official website and follow the installation prompts. Once it’s installed, launch the XAMPP Control Panel to manage your server. You’ll need to start the Apache and MySQL modules, which will allow your local server to run.
Q4: What’s the next step after installing XAMPP?
A4: Once XAMPP is up and running, the next step is to download WordPress. Head to the official wordpress website,grab the latest version,and extract the files into the ‘htdocs’ folder within your XAMPP installation directory. This folder is where XAMPP serves your websites from.
Q5: How do I set up a database for my WordPress site?
A5: Setting up a database is a breeze! Open your web browser and navigate to localhost/phpmyadmin.Here, you can create a new database for your WordPress installation by clicking on “Databases” and entering a name for your new database. It’s that easy! Just remember the database name—you’ll need it later.
Q6: How do I install WordPress after setting up my database?
A6: You’re almost there! In your web browser, go to localhost/your-folder-name (where ‘your-folder-name’ is the name of the folder you created for WordPress). You’ll be guided through the WordPress installation process, where you’ll enter your database details, configure your site settings, and create an admin account.
Q7: What if I encounter any issues during installation?
A7: No worries! It’s perfectly normal to run into some hiccups. Common issues can often be resolved by checking error messages, ensuring your Apache and MySQL services are running, or confirming that you’ve entered the correct database information. There are plenty of forums and communities online that can help you troubleshoot any problems.
Q8: Can I customize my WordPress site locally just like I would online?
A8: Absolutely! Once your WordPress site is set up locally, you have complete freedom to customize themes, install plugins, and experiment with different settings. It’s a safe space to try out new ideas without the risk of breaking a live site.
Q9: Is it difficult to move my WordPress site from XAMPP to a live server later on?
A9: Not at all! While there are a few steps involved, moving your site from local to live is manageable. You’ll need to export your database and transfer your files to your web host. many hosting providers offer guides on how to do this, and there are plugins available that can simplify the process even further.
Q10: What’s the biggest takeaway from installing wordpress on XAMPP?
A10: The biggest takeaway is the empowerment that comes with having your own local development environment! You can learn at your own pace, make mistakes without consequences, and gain confidence in your WordPress skills. Plus, once you’re ready to go live, you’ll be well-prepared to tackle your real website project. So why wait? Dive in and start experimenting today!
Key Takeaways
And there you have it! Installing WordPress on XAMPP locally is not just a simple task; it’s a gateway to a world of endless possibilities for your web development journey. Whether you’re a complete beginner or someone looking to brush up on your skills, setting up a local environment allows you to experiment, learn, and create without the pressure of a live site.
Now that you’ve got the hang of it,why not dive deeper? Play around with themes,plugins,and customizations until you feel like a WordPress wizard. Remember, practice makes perfect, and having a local setup means you can make all the mistakes you need to learn and grow.
So, are you ready to unleash your creativity? Go ahead and start building your dream website right from the comfort of your own computer. And if you run into any hiccups along the way,don’t hesitate to return to this guide. We’re here to support you on your journey!
Happy coding, and may your local WordPress experience be as fulfilling as you envision!